Google provides a SAML standard compliant autentication flow which is entirely compatible with MyWorkDrive.
Overview
Google provides general guidance in their Google Workspace Admin Help
Google SAML authenication is configured in MyWorkDrive using the SAML Single Sign on Manual Configuration option.
Before you begin, your MyWorkDrive server must be available to Google Workspace via published URL to complete the SAML authentication flow. If your MyWorkDrive server does not have a public endpoint which is open to Google Workspace and your user community, please enable access before starting the configuration process. See our publishing article for a discussion of making MyWorkDrive available to users.
The SAML Login flow, as described in our Manual configuration guide requires
-
The user to be able to reach the MyWorkDrive server to initiate the login.
-
The MyWorkDrive server to be able to re-direct the user to Google as the identity provider.
-
Google to be able to pass the SAML authortization back to MyWorkDrive via the Assertion Consumer Service URL.
The MyWorkDrive server must also be trusted for delegation to any file servers which will use NTFS permissions and AD credentials (typically any using SMB Connections). See our Delegation Article for a discussion of requirements and configuration options
Requirements
To configure the Google Identity Provider
You will need set three pieces of information in the Google SAML App setup process
1) Your Assertion Consumer Service (ACS) url. This is formed by appending /SAML/AsssertionConsumerService.aspx to your MyWorkDrive server URL
eg https://yourmyworkdriveserver.domain.tld/SAML/AsssertionConsumerService.aspx
2) The Entity ID (service Provider Name) of your MyWorkDrive server. Typically this will simply be MyWorkDrive
3) The Name ID Format will be EMAIL. It is also referred to as Primary Email. It will be mapped to User-Principal-Name
The email address the user signs in to Google Workspace SAML with must match the user's UPN on Active Directory.
To Configure MyWorkDrive, you will retrieve the following information from Google
1) SSO Url. This will be used as the SingleSignOnServiceURL and will appear in the format https://accounts.google.com/o/saml2/idp?idpid=$string
2) Entity ID (Service Provider Name). This is also in the format of a URL, which appears very simlilar to the SSO url but is NOT the same. https://accounts.google.com/o/saml2?idpid=$string
3) Certificate. You may download the certificate from Google OR construct it from the metatdata file (also a download). The downloaded file extension will be .pem. Rename it to .cer.
Configuration in Google Workspace
Begin the process in Google Workspace. Sign in with a super administrator account to the Google Admin console.
Go to Menu and then Apps > Web and mobile apps. Click Add App and then Add custom SAML app.
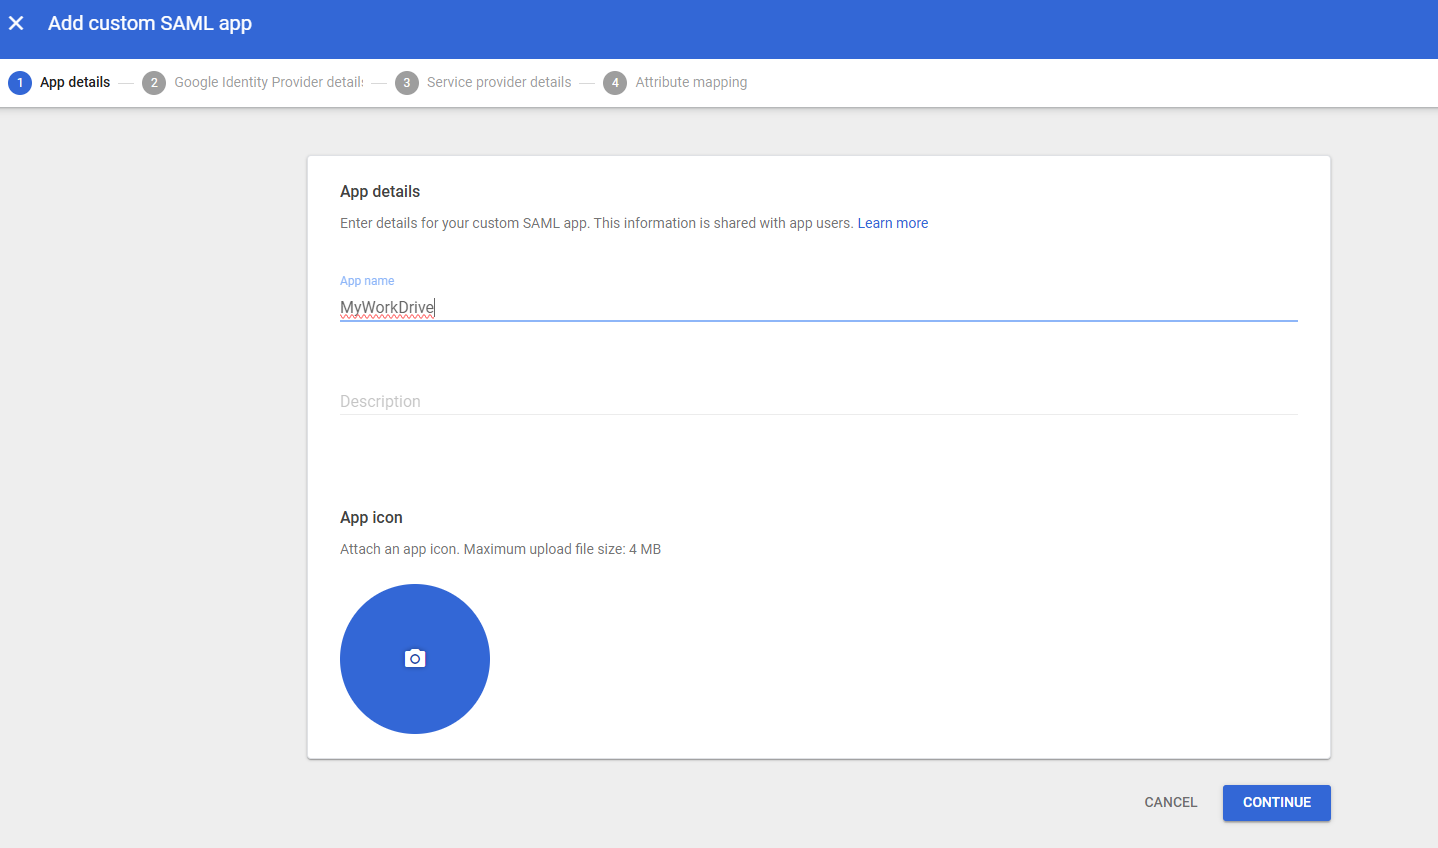
On the App Details screen (1),
-
App Name - MyWorkDrive (required)
-
Description - MyWorkDrive File Share Remote Access (optional)
-
App icon - optional
Click Continue
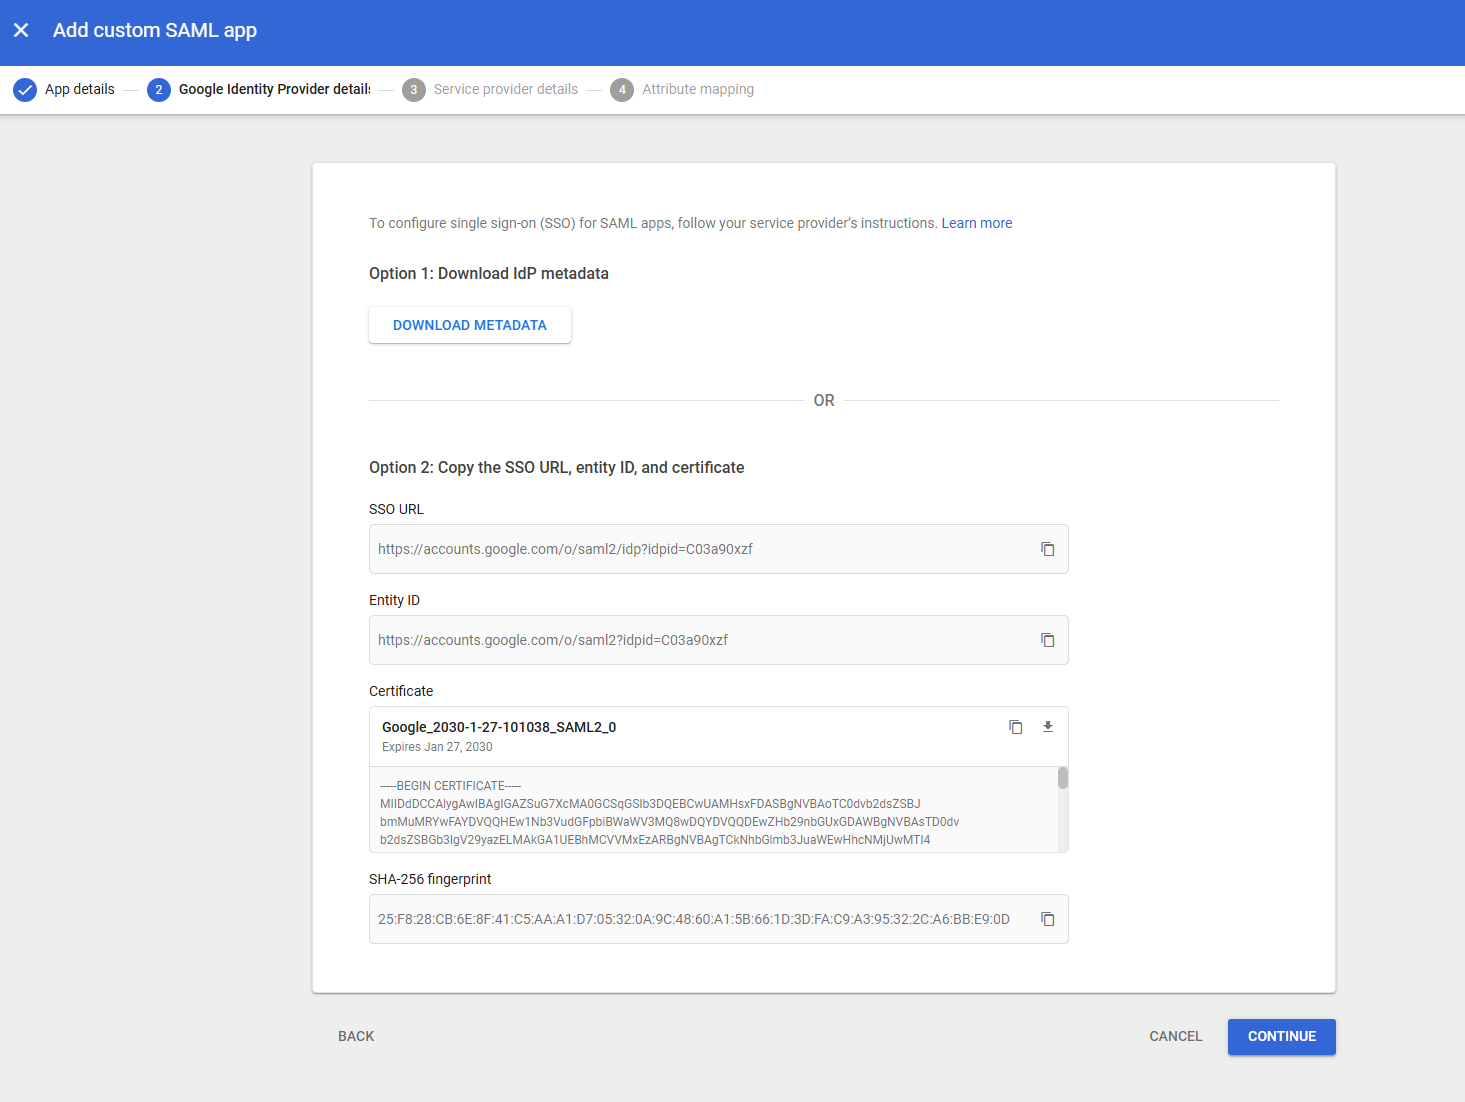
On the Google Identity Provider Details screen (2),
-
Copy the SSO Url, in the format https://accounts.google.com/o/saml2/idp?idpid=$string
-
Copy the Entity ID (service provider name), in the format https://accounts.google.com/o/saml2?idpid=$string
-
Download the certificate file. Rename the downloaded file from .pem to .cer.
Note the expiration date. You will want to set a reminder in a local calendar to refresh the certificate and update it on MyWorkDrive on or prior to the expiration date.
Note the Google Identity Provider Details screen offers a Metadata download. This is not used with MyWorkDrive.
Click Continue
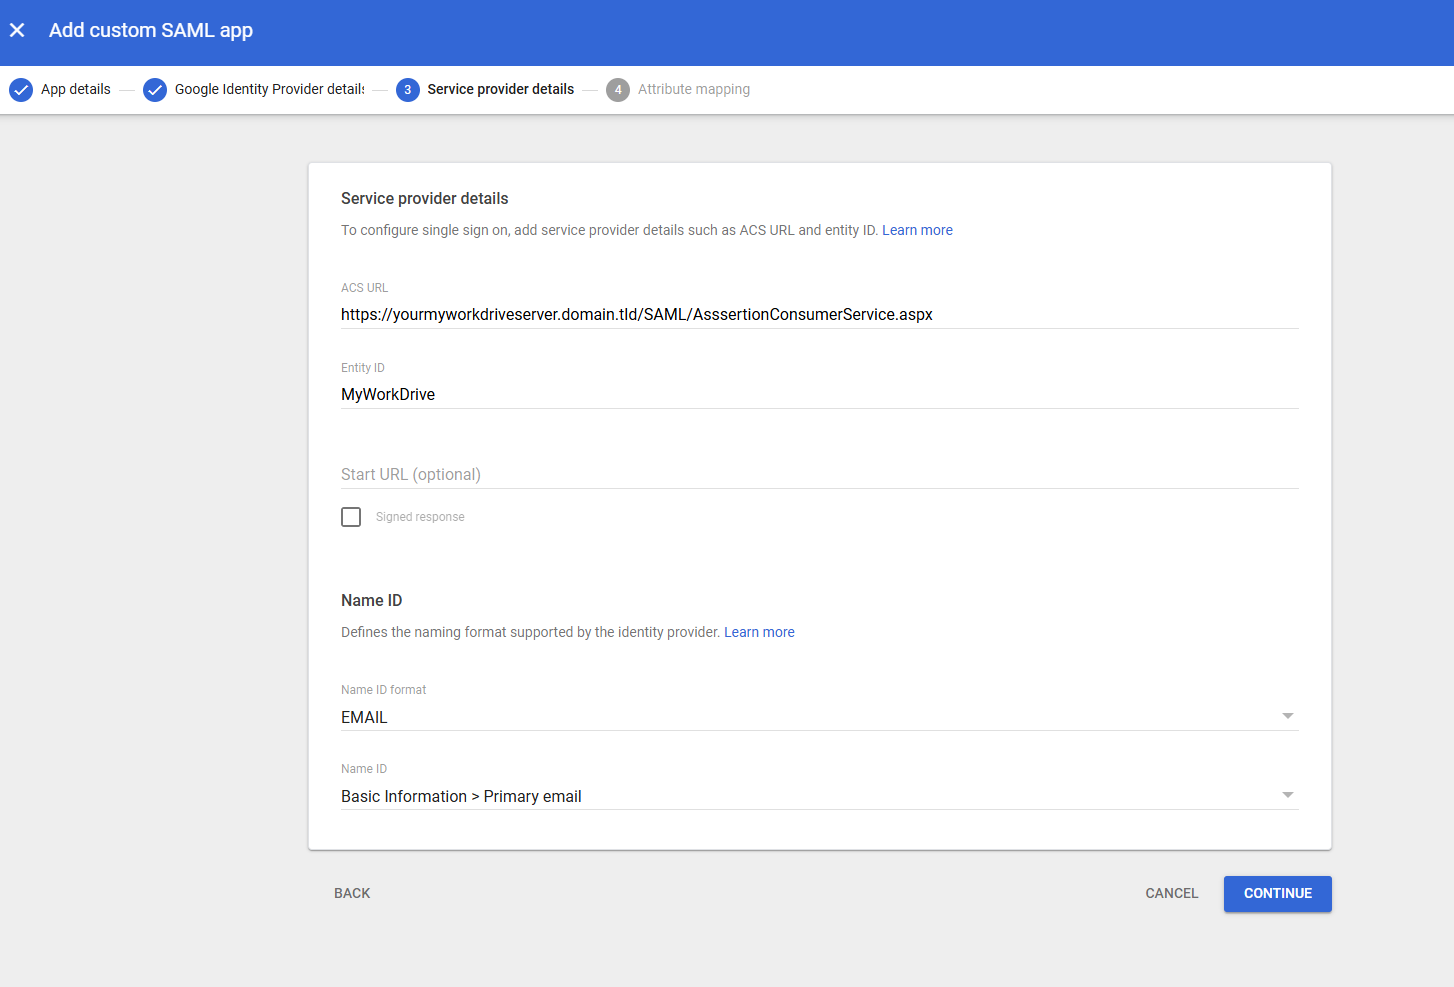
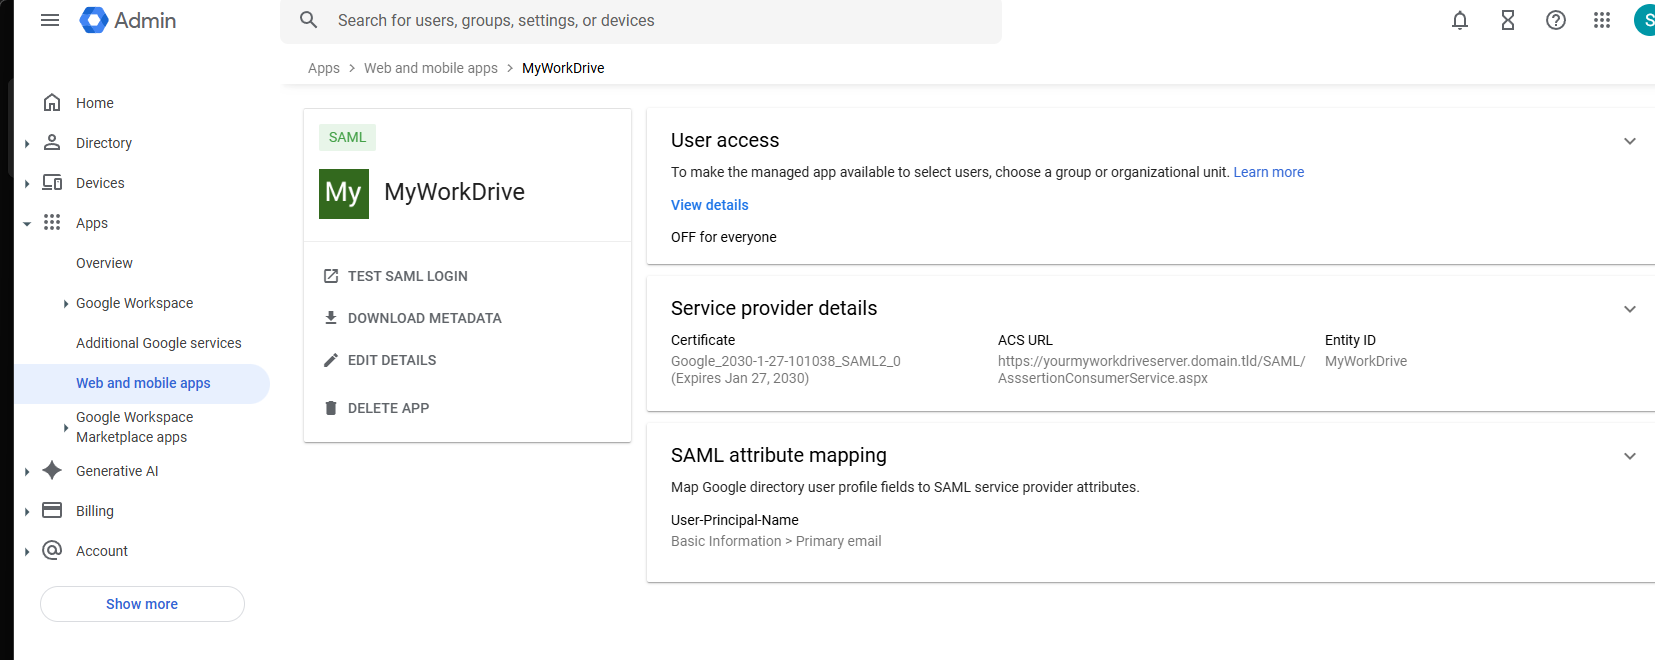
On the Service Provider Details screen (3)
-
Fill in the ACS URL. This will be https://yourmyworkdriveserver.domain.tld/SAML/AsssertionConsumerService.aspx
-
Fill in the Entity ID. This will be MyWorkDrive
-
Start URL is not required
-
Signed response is not required or recommended
-
Set the Name ID Format to EMAIL
-
Name ID should default to Basice Information > Primary emai. If not, set it as this.
Click Continue
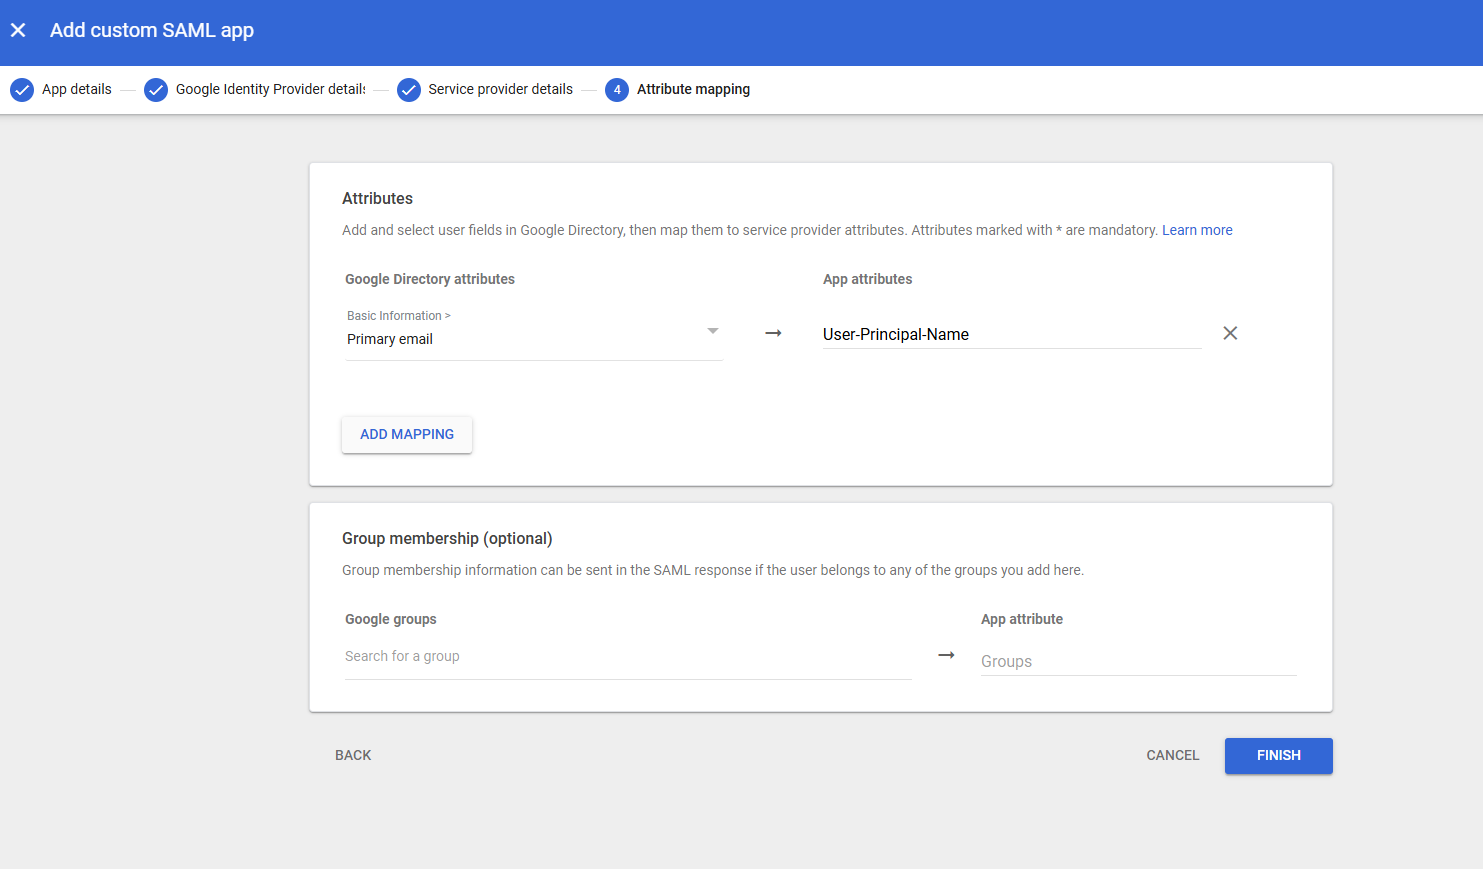
Attribute Mapping (4)
-
In Attributes, click Add Mapping
-
Select Primary Email from the Basic Information drop down
-
Add User-Principal-Name as the App attributes mapping
-
No group membership information is required.
Click Finish
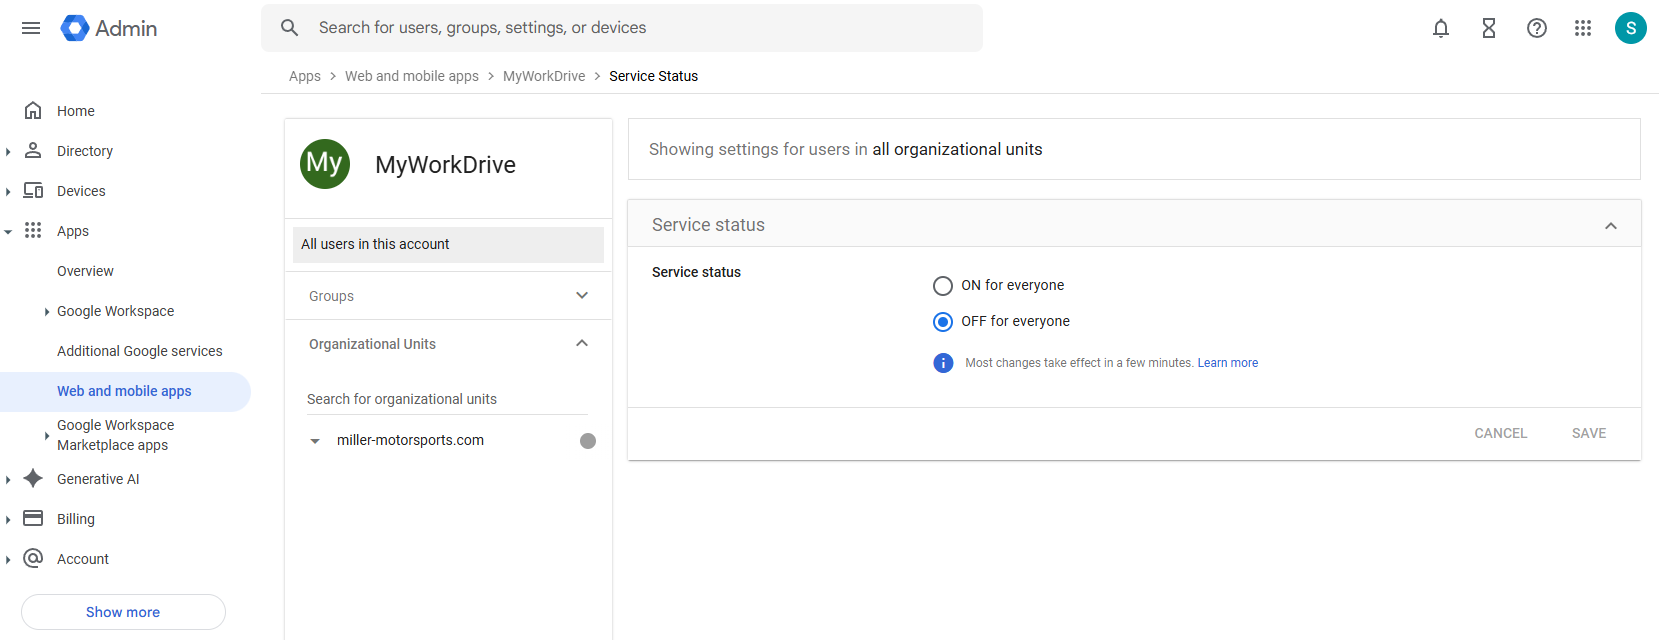
The final step in Google Workspace Admin is to enable the new app.
In App Details, click to expand the User Access section.
- Choose to enable the app for Everyone or set Groups, as appropriate for your organization
Configuration in MyWorkDrive
Configuration in the UI
Sign in to the MyWorkDrive Admin console.
-
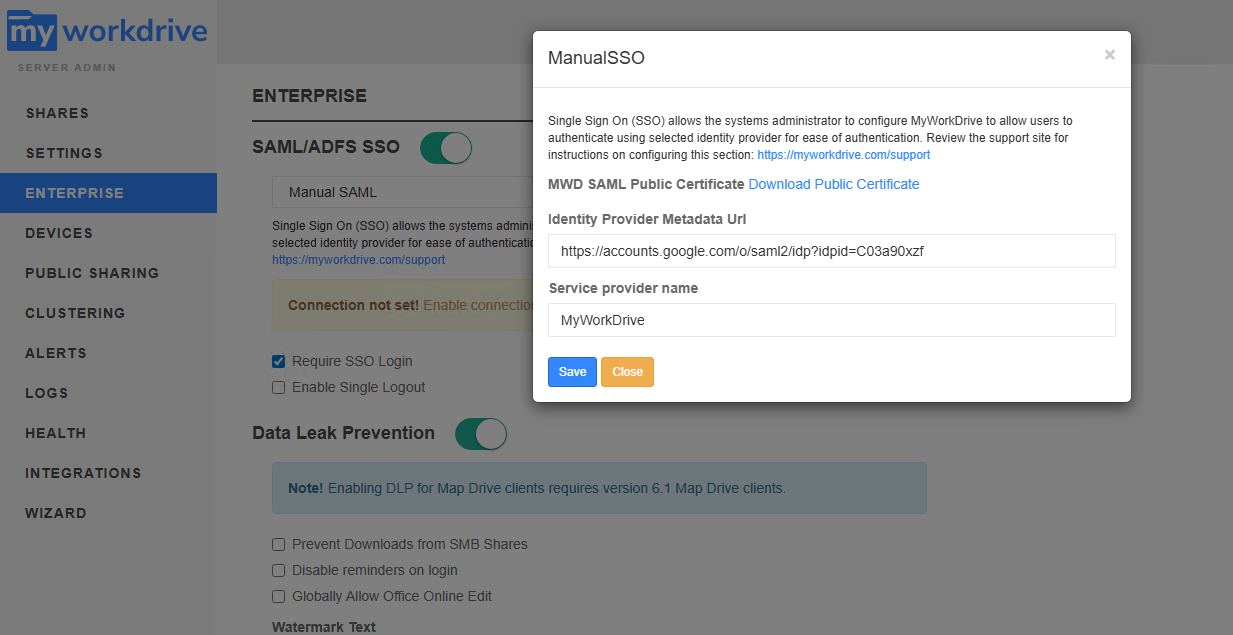
From the Enterprise tab, enable SAML/ADFS SSO and select Manual SAML from the drop down.
-
Click Enable Connection.
-
Google does not offer a hosted metadata option. Paste the SSO url you copied from google into the Metatada field.
-
Service provider name will be MyWorkDrive unless you changed it in Google.
Click Save on the Connection settings box.
Click Save on the Enterprise settings page.
If you want to require users to login with the SSO, check the box on the Enterprise setting page which indicateS Require SSO Login.
If this box is not checked, users will be allowed to login with their domain username and password. You will be able to test the SSO login using the SSO Login url in the webclient, http://myworkdrive.example.com/account/login-saml.aspx
Configuration in the saml.config file
The rest of the configuration will be completed by editing the saml.config file.
The final saml.config file must have three distinct sections in it.
<PartnerServiceProviders>
<ServiceProvider>
PartnerIdentityProviders
If any of those items is missing, the authentication flow will fail.
Open the saml.config file in C:\Wanpath\WanPath.Data\Settings\SAML
Use a self-elevating editor like notepad++, or if editing in Notepad or another editor, open the application as admin before opening the saml.config file
Identify the
<ServiceProvider> section. If this section is present, you may leave it as is.
if this section is missing, open the saml.config.example file and copy it into the saml.config file.
It should look like this.
<ServiceProvider Name="MyWorkDrive" Description="MWD Service Provider" LocalCertificateFile="C:\Wanpath\WanPath.Data\Settings\SAML\Certificates\mwd.pfx" LocalCertificatePassword="password" AssertionConsumerServiceUrl="~/SAML/AssertionConsumerService.aspx" />
(note, the value password will be a value, not the phrase password)
In the saml.config.exampl file, find the example for Google and copy the four rows for PartnerIdentityProvider to the saml.config file in the PartnerIdentityProviders section of the file.

If that section does not exist in the saml.config file, you should add it by adding a row titled <PartnerIdentityProviders>
Then paste the four rows from the example file.
Followed by a row titled </PartnerIdentityProviders>
Update the information copied from the example file with the information copied from Google.
Name= will be the EntityID value from Google in URL Format.
SingleSignOnServiceURl= is the SSO URL from Google, in URL format.
Note that these urls look very similiar but are subtly different.
The name= contains ?idpid=
The SingleSignOnServiceURL= contains ?idp?idpid=
Be sure to place the correct URL in the correct value.
Copy the certificate file you downloaded and renamed from Google to your MyWorkDrive server.
Place it in C:\Wanpath\WanPath.Data\Settings\SAML\Certificates\
Update the path in the PartnerCertificateFiles= line to be the location and name where you saved your certificate. Your certificate name may not be "google.cer" as copied from the example and may be something like Google_2030-1-27-101038_SAML2_0.cer. The name on the file system does not matter, as long as you are specifying the correct filename in the saml.config file.
The final configured entry for PartnerIdentityProviders should appear like this
<PartnerIdentityProviders>
    <PartnerIdentityProvider Name="https://accounts.google.com/o/saml2?idpid=C03a90xzf"
                             Description="Google"
                             SingleSignOnServiceUrl="https://accounts.google.com/o/saml2/idp?idpid=C03a90xzf"
                             PartnerCertificateFile="C:\Wanpath\WanPath.Data\Settings\SAML\Certificates\Google_2030-1-27-101038_SAML2_0.cer"/>
  </PartnerIdentityProviders>
lastly, if the PartnerServiceProvider section is missing from the saml.config, create it using the information from the ServiceProvider section.
Add the tag <PartnerServiceProviders>
On the next line, copy the entire block for ServiceProvider
rename ServiceProvider to PartnerServiceProvider
On the next line, add </PartnerServiceProviders>
The complete section will look like
<PartnerServiceProviders>
    <PartnerServiceProvider Name="MyWorkDrive" Description="MWD Service Provider" LocalCertificateFile="C:\Wanpath\WanPath.Data\Settings\SAML\Certificates\mwd.pfx" LocalCertificatePassword="password" AssertionConsumerServiceUrl="~/SAML/AssertionConsumerService.aspx" />
  </PartnerServiceProviders>
The completed configured saml.config file will look like this

Save the saml.config file. Be sure to save as admin.
Restart MyWorkDrive services. In an elevated command/powershell/terminal window, issue an IISReset. This step is necessary because we edited the configuration files outside of the Admin console.
Google SAML SSO is now ready for user testing.