The instructions in this article are only applicable to MyWorkDrive installations using Active Directory for user identity. SAML SSO configuration is only required/supported when using Active Directory. Entra ID Installations use a native Microsoft login.
MyWorkDrive with Entra ID
Note: Entra ID is formerly known as Azure AD.
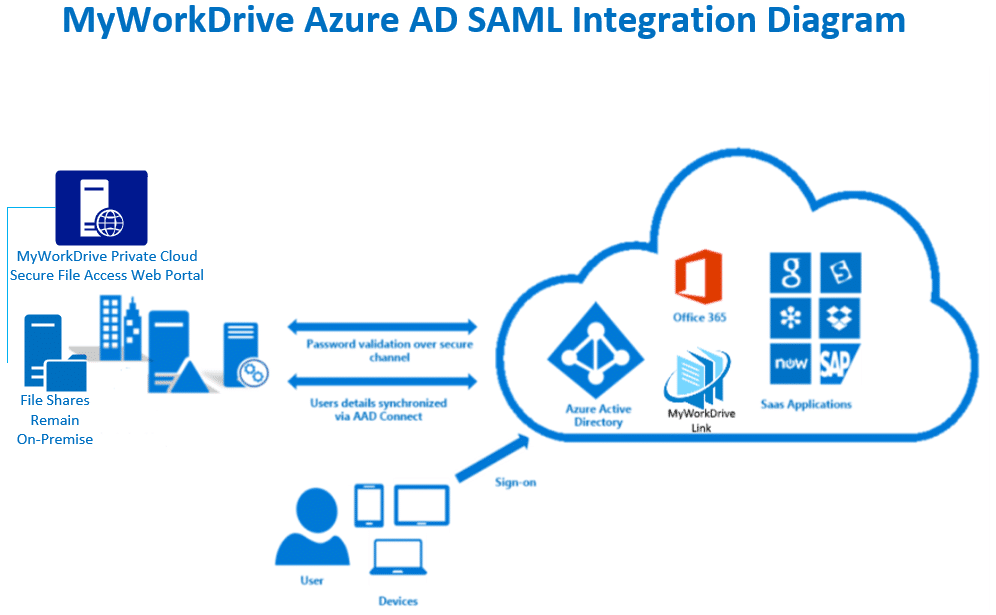
MyWorkDrive supports SAML-based web file manager Single Sign-On (SSO) to Entra ID instead of traditional Active Directory authentication for all necessary logins.
This article covers setting up Entra ID SSO with a public URL. If you wish to use an internal URL, you would want to deploy an Azure Application Gateway.
For SAML, MyWorkDrive acts as a Service Provider (SP) while the Entra ID acts as the identity provider (IDP). In a typical scenario, customers sync their Active Directory credentials to Entra ID. User logins are set to use the same UPN suffix to log in to Active Directory as they do in Entra ID (in most cases, this is the company's Office 365 Subscription).
Configuration using these instructions will permit you to enable/apply conditional access policies for features in Entra, such as Pre-Auth and MFA, to this Enterprise Application.
Entra ID SAML Setup
Before you start: Ensure the MyWorkDrive server is trusted for delegation as per our Delegation Article.
MyWorkDrive is listed as an approved enterprise application in the Azure Marketplace.
Review the instructions in Microsoft’s tutorial and information links here.
Prerequisites
- Ensure users have a UPN suffix applied for the domain name to match Entra ID Login name so they can log in to your MyWorkDrive server with their email address (most companies sync their Active Directory to the same Entra ID directory that they use to log in to Office 365).
- Ensure the MyWorkDrive server is trusted for delegation as per our Delegation Article.
- Ensure your MyWorkDrive server is accessible on the internet for client login (web, mobile, mapped drive). Enable the Cloud Web Connector or set up your own public SSL certificate and hostname pointing to your MyWorkDrive server over port 443 (SSL).
Setup Steps
- Log in to portal.azure.com as an admin and connect to Entra ID Domain (if you are using Office 365, this is the same account you use to log in to portal.office.com).
- Click on Azure Active Directory.
- Click on Enterprise Applications.
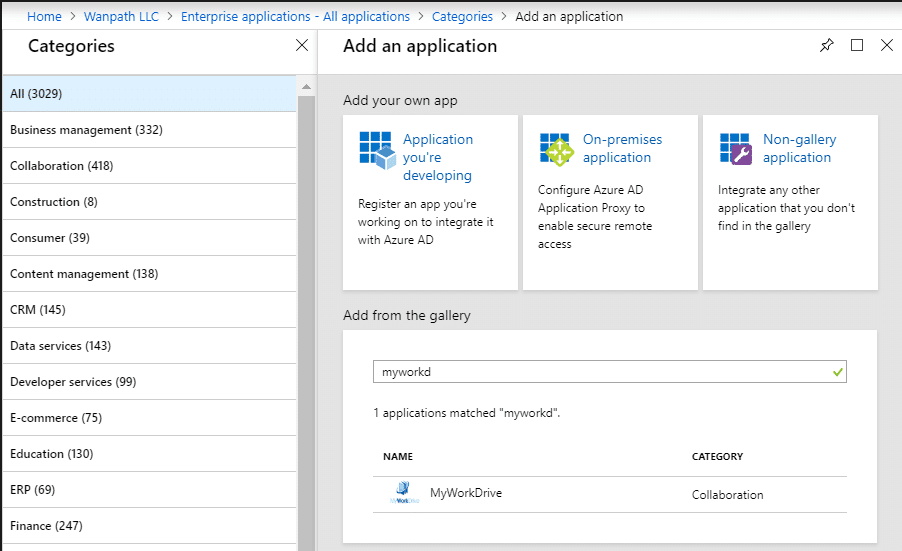
- Click on New Application.
- Search for MyWorkDrive.
- Add MyWorkDrive as an Enterprise App.
- Click Single sign-on from the menu on the left and choose SAML (you will only need to choose SAML the first time you begin configuration).
- Ignore the configuration guide presented at the top of the page. This is helpful when you are setting up an SSO from scratch, but it offers unnecessary steps when using the template we provide.
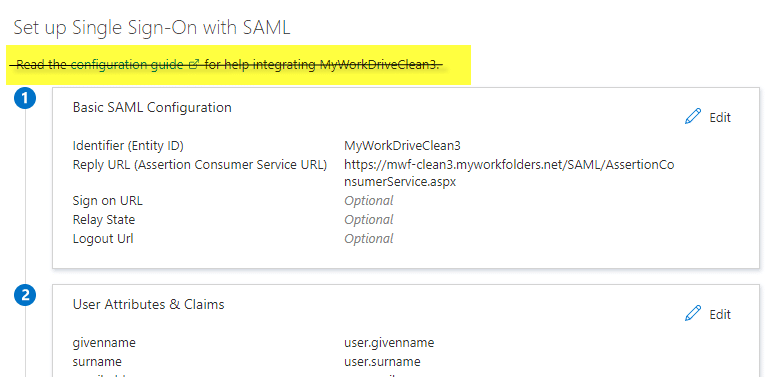
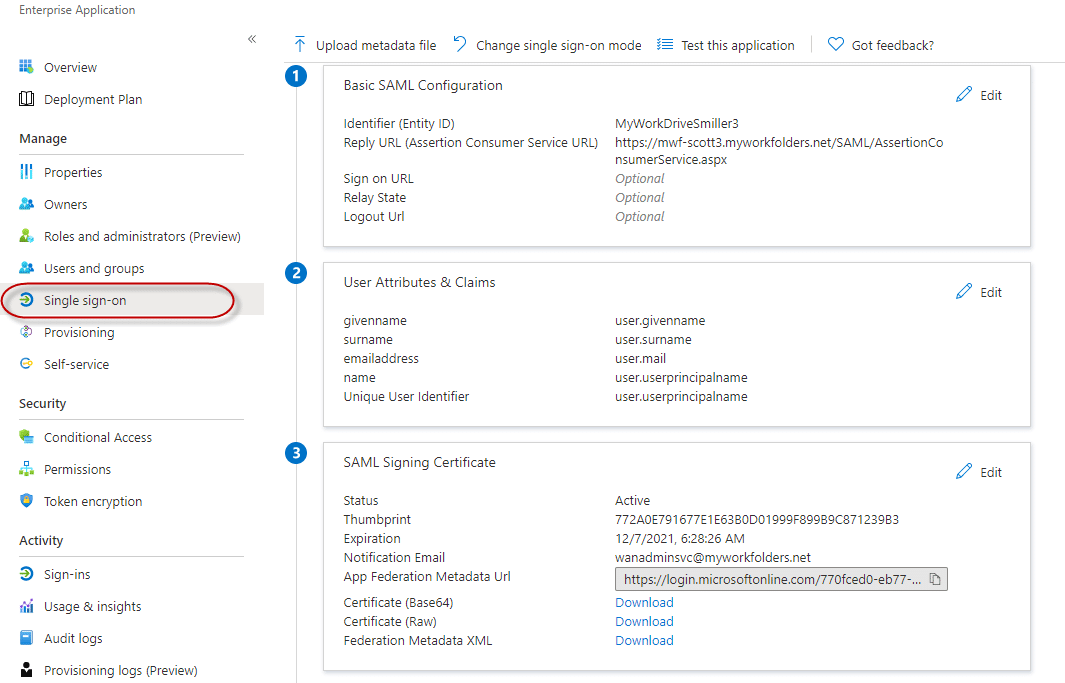
- Start by editing the information in box 1. Select Edit.

-
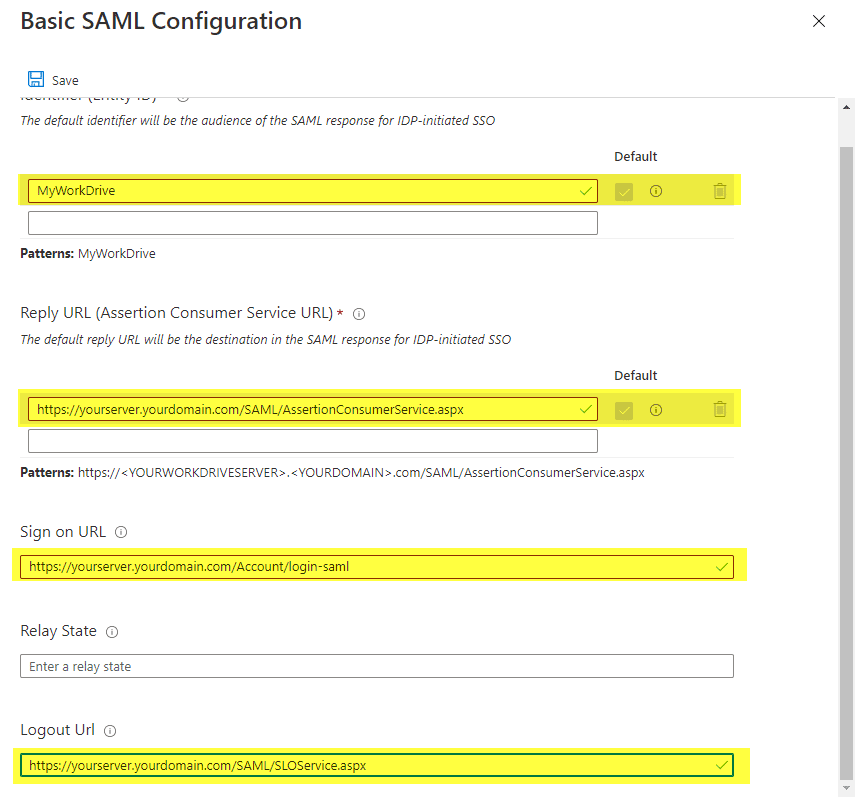
Accept the default Entity ID of MyWorkDrive.
- This only needs to be changed if you have multiple MyWorkDrive Servers set up in your Entra, as Entra ID requires each enterprise app to have a unique Entity ID. When changed, it must also be changed to match the Service Provider Name field of SSO setup in the MyWorkDrive admin panel. You will get an error about an Entity ID mismatch on user sign-in if they are not set correctly.
-
Enter your reply URL
- This will be your host name followed by /SAML/AssertionConsumerService.aspx (for example: https://myworkdrive.example.com/SAML/AssertionConsumerService.aspx).
- If you intend to support multiple domain names for the server, such as both a Cloud Web Connector and a Direct connection address, be sure to enter all of them as possible reply/response URLs.
-
Enter your sign-on URL if users will be logging on to MyWorkDrive directly (instead of or in addition to accessing through myapps.microsoft.com portal) with your host name followed by: /Account/login-saml (for example: https://myworkdrive.example.com/Account/login-saml).
- Note that this is technically optional, as you can retain a traditional login while only providing SSO as an option, though most often you will want to set it up this way.
-
Single logout URL.
- If you wish to use single logout, set your logout URL as https://myworkdrive.example.com/SAML/SLOService.aspx Note the additional information below about how AzureAD handles single logout.
- Nothing needs to be entered in the Relay State field. Leave it blank.
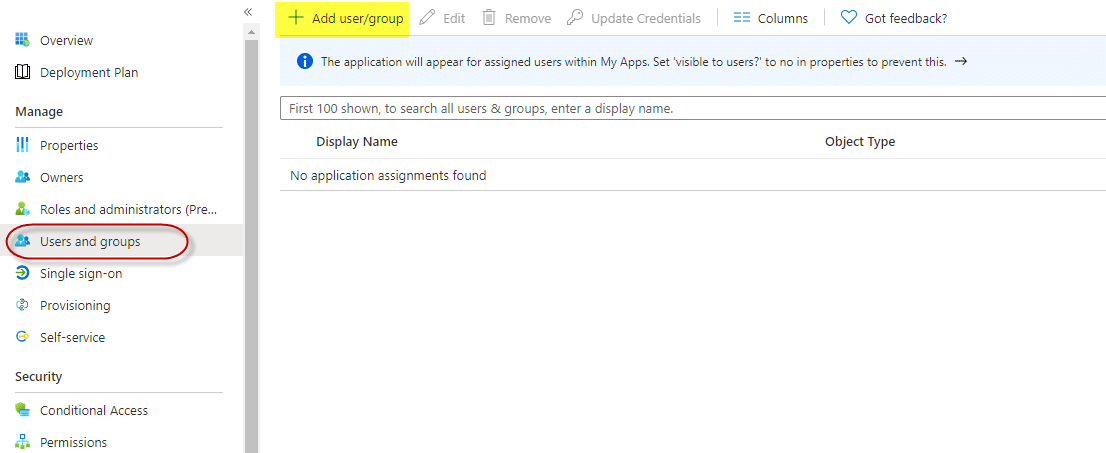
- Next, make the new MyWorkDrive server available to users. Only those users who actually have permissions to shares via NTFS and as configured on share permissions in MyWorkDrive will be able to successfully log in, regardless of how you enable access here.
You have two options - Permit all OR manually select specific users.
- To permit all, click Properties from the left menu, then set User Assignment Required to No.
- This is the most normal configuration as it avoids duplicate administration. Simply add users to AD and the appropriate groups. Assuming you're syncing your local AD to Entra, those users will be able to log in to the MyWorkDrive server and get the shares they are granted permission to as configured in MyWorkDrive without needing to assign them one by one to the Enterprise App.

Or to manually select users and groups
- In the Azure Active Directory portal for the new MyWorkDrive App. Select users and groups from the left menu, then use the Add User/Group item at the top of the screen.
- Note Domain Users groups do not sync to Entra by default. In most cases, if you are manually assigning users, you will be assigning by name.
- In box 3, copy the App Federation Signing Certificate Metadata URL to the clipboard.
- No other changes are required in box 3; you do not need to edit, just copy the URL using the copy icon.
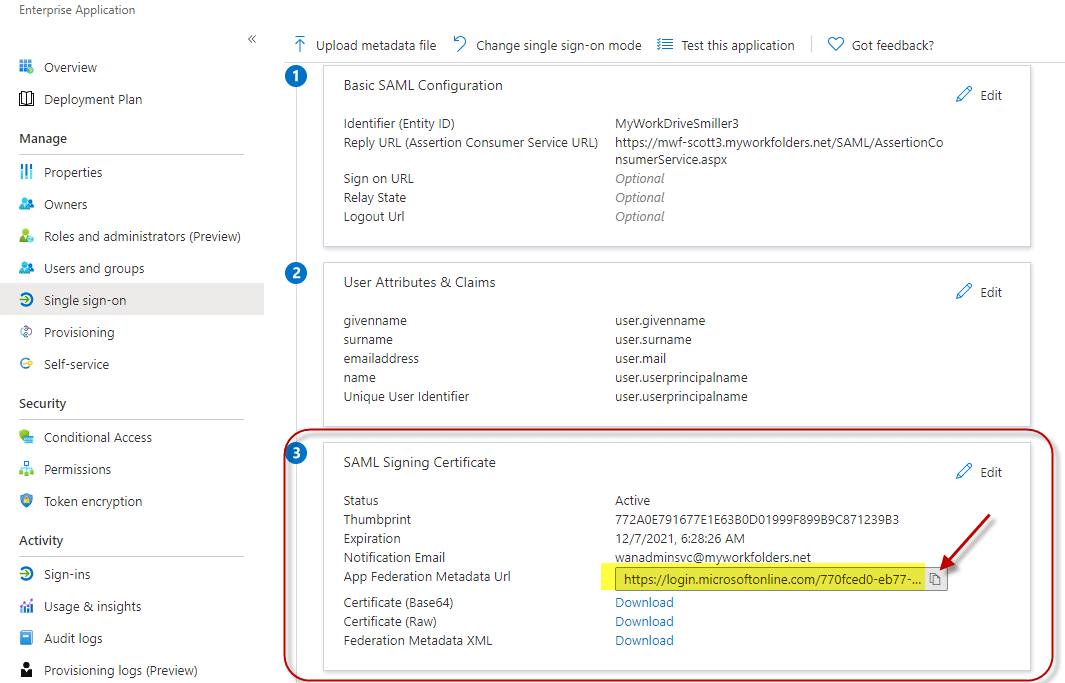
- Ignore boxes 4, 5, and 6. Like the configuration instructions above, this is helpful if you are setting up an SSO from scratch - since these instructions use our template, actions in those boxes are not required.
-
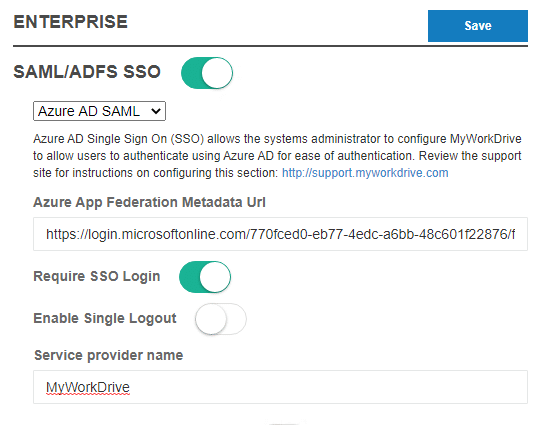
On the MyWorkDrive server in the admin panel, go to the Enterprise Section.
- Enable SAML/ADFS SSO.
- Choose Entra ID (Azure AD) SAML
- Paste in the Azure App Federation Metadata URL you copied from box 3.
-
Optional items:
- Click "Require SSO Login" (this will automatically redirect all connections to Entra ID SAML Login). If you do not select Require SSO Login, users will log in when going to your MyWorkDrive server URL with their traditional domain login, and the Entra ID login will only be used when clicked as a link from the Office portal or MyApps.
- Select Enable Single Logout, see note below about how Logout is handled in AzureAD
- If you changed the Entity ID in Entra ID setup box 1, change the Service Provider name to match exactly what you entered in Entra ID Setup.
- Click Save. This will automatically pull down the Entra SSL Certificate and settings for you.
Test Access
- We suggest initially testing with the web browser before proceeding to test the other clients.
- You may wish to use a different browser from what you routinely use/are logged in to, OR private browsing mode, to validate the Entra ID login experience and any conditional access policies for MFA you may have applied.
- If you enabled Require SSO Login, browse to your server's Login URL, e.g., https://yourserver.company.com, and you will be redirected to Entra ID SAML to log in. If you did not enable Require SSO Login, you will need to specify the SAML Login URL e.g. https://yourserver.company.com/account/login-saml.m
- Login using Entra ID. After successful login, your test user will be redirected to your MyWorkDrive website, and their assigned file shares will be displayed.
- Alternatively, if you are assigning users to the App in Entra ID, you may login as an assigned user to https://myapps.microsoft.com. Select the MyWorkDrive application.
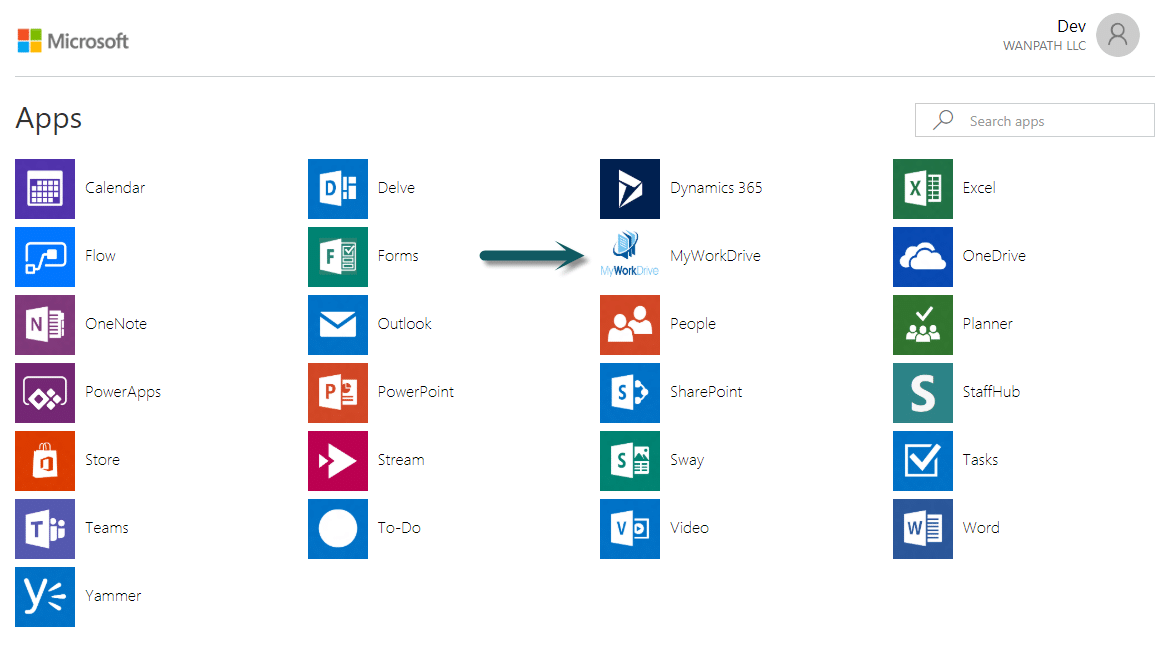
The user is automatically logged into your MyWorkDrive browser Web File Manager.
If, upon login, the user's shares are present but are blank when you click into them, that's an indication that Delegation is not set correctly. Please refer to the Delegation setup article. Note that changes to delegation can take 15 minutes or longer to propagate on AD. In cases of a large AD, several hours have been noted for delegation to fully propagate.
SSO Logins are fully compatible with all MyWorkDrive features, including:
- All clients (Web, Mobile Web, Windows Map Drive, Mac Map Drive, iOS, Android, and Teams).
- The Cloud Web Connector.
- Editing in local Office from the web client.
- Places in mobile Office.
SAML Logout
Azure Active Directory doesn’t support SAML logout. SP-initiated SLO, where a SAML logout request is sent to Entra ID, doesn’t cause a logout response to be returned. Instead, Entra ID displays a message indicating the user is logged out and that the browser windows should be closed. Logout from Entra ID doesn’t cause a logout request to be sent to the service provider. Entra ID doesn’t support configuring a SAML logout service URL for the service provider.
Troubleshooting
- Ensure you are using a browser for testing in private or incognito mode to eliminate any caching issues.
- Double-check that the user is able to log in without SAML and that they are using an email address that matches their UPN in Active Directory.
-
User receives the following error: The signed in user @.com is not assigned a role for the application
- As per setup notes above: Assign a user or group they are a member of in the Azure Active Directory portal to the new MyWorkDrive App (Enterprise applications > All applications > MyWorkDrive > Single sign-on > SAML-based sign-on) > users and groups (or disable the user assignment required by setting it to no).
- Folders are displaying as blank after logging in: Ensure the MyWorkDrive server is trusted for delegation as per our Delegation Article
-
User receives the following error: The reply URL specified in the request does not match the reply URL's configured for the application
- Check to ensure the URL specified in Entra ID SAML matches the public web address of the server, and if reverse proxies are used, they are not rewriting the URL.
- Additionally, if you are using your own hostname - e.g., https://myworkdrive.example.com be sure to disable the MyWorkDrive Cloud Web Connect under settings on your MyWorkDrive server (when the Cloud Web Connector is enabled, we assume you're using our *.myworkdrive.net and make changes to the reply URL to accommodate it).
- If you are receiving multiple MFA prompts during login, make sure you disable two-factor in MyWorkDrive Enterprise after enabling Require SSO. If you have an MFA requirement in Entra ID, that will be called as part of the login through Entra ID, and no settings are required in MyWorkDrive to enable it.
Renewing your certificate
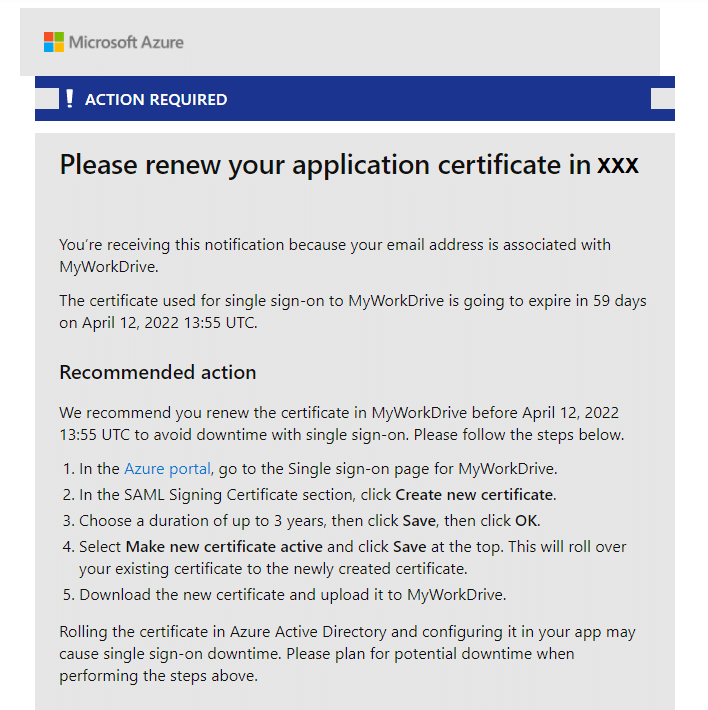
The SSO certificate issued by Microsoft and used by MyWorkDrive to secure communications between Entra ID and your MyWorkDrive server periodically expires. The default is 3 years, but you can choose a lesser amount on creation.
Then your certificate is due to expire, you'll receive an email with some general guidelines from Microsoft, but thanks to the integration work we've done to make Entra ID easier to deploy, it's actually easier than Microsoft describes.
The email you'll receive notes 5 steps.
The two changes to the instructions are to:
- Delete the old certificate from Entra/Azure
- Use MyWorkDrive to download the new certificate. There is no need to manually place the certificate.
After step 4
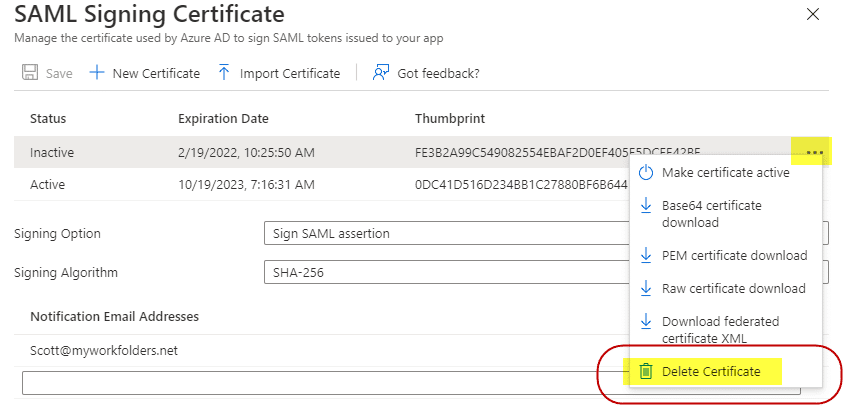
Delete your old certificate in AzureAD. You'll immediately be updating MyWorkDrive in the next step with the new one, so make the new one Active (if it isn't done automatically) and delete the old one as it is no longer necessary. On the old/inactive certificate, click on the 3-dot menu on the left edge of the certificate row and choose Delete Certificate.
Instead of Step 5
Now, with only one cert showing on your MyWorkDrive Entra ID configuration, save the Entra ID Page, and then log in to the MyWorkDrive admin panel on the MyWorkDrive server and browse to the Enterprise tab.
Confirm you have Entra ID Configured, and then just save the page.
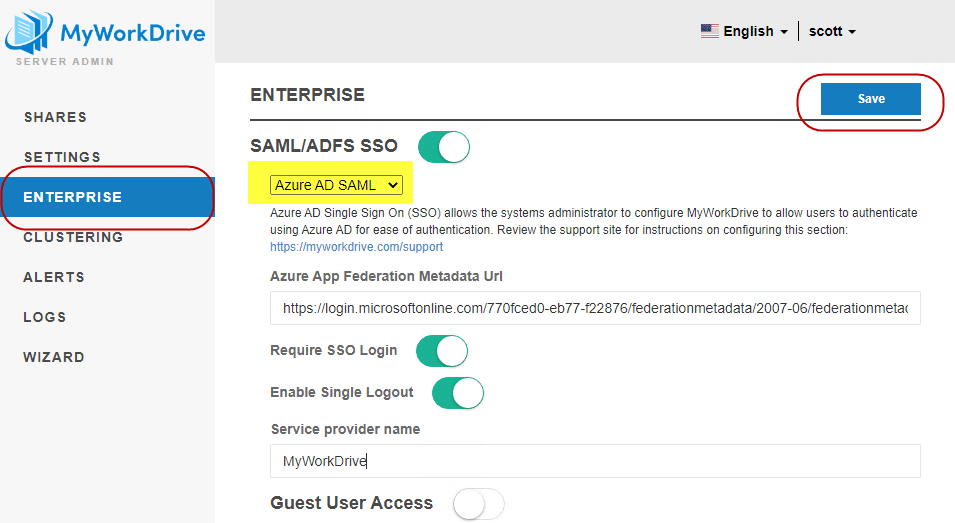
MyWorkDrive will use the built-in Entra ID configuration to connect to your Entra ID and download and update the certificate. There is no need to manually place the new certificate on the file system or "Upload it to MyWorkDrive"; MyWorkDrive will take care of that for you.
The SAML certificate may be stored in a number of locations, depending on your version of MyWorkDrive and whether you have Clustering enabled.
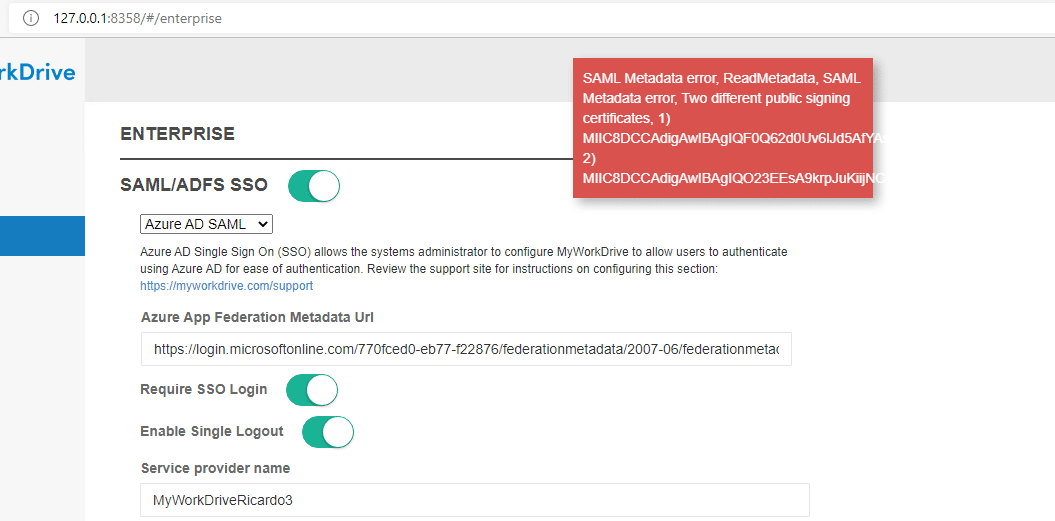
Note that if you receive an error message about multiple public signing certificates, that is an indication that you failed to delete the old certificate from Entra ID. Please log back in to Azure/Entra and double-check that the new certificate was made active and the old certificate was deleted.