This article details the process of adding Azure File Shares or Azure Blob Containers you have created to MyWorkDrive Shares. This article assumes you already have storage accounts defined in Azure.
Our Azure Storage Options article details creating Shares/Containers in Azure and the various options available to you.
Azure File Shares
Entra ID Auth (User)
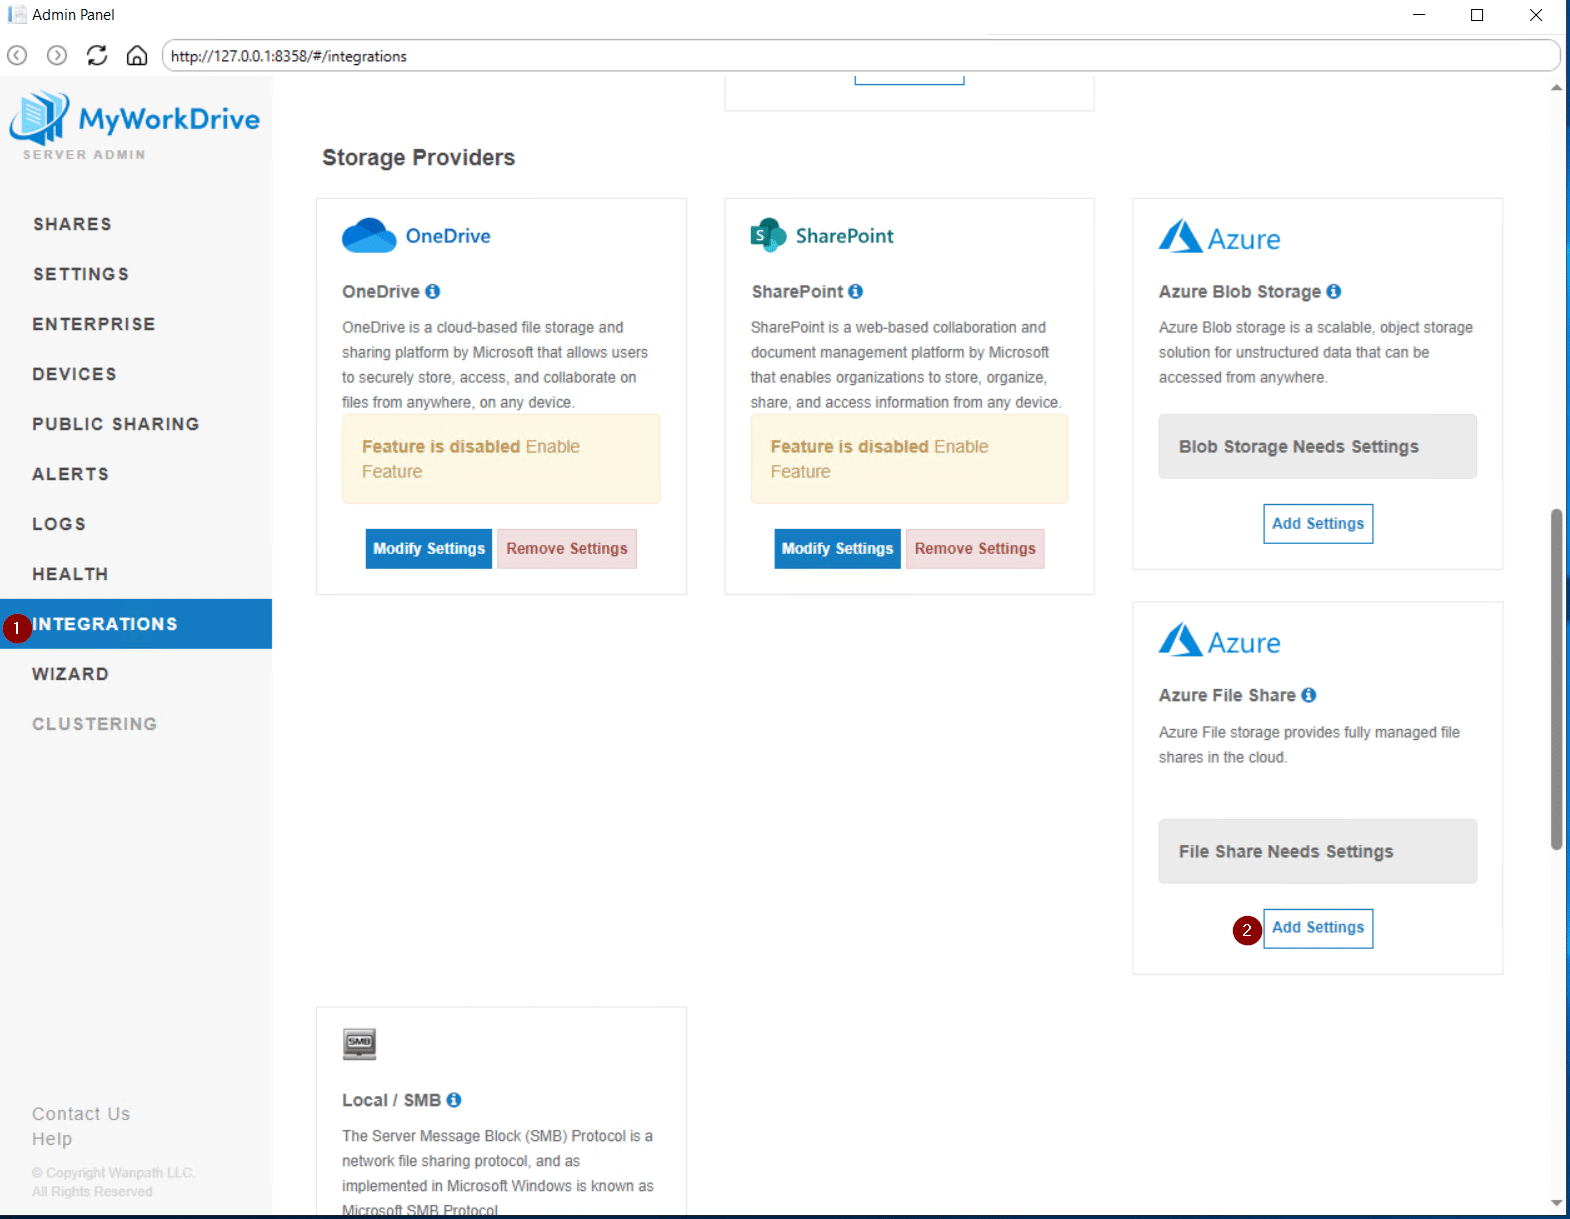
Navigate to the Integrations tab and scroll down to Storage Providers. Select Add Settings or Modify Settings under Azure File Share.
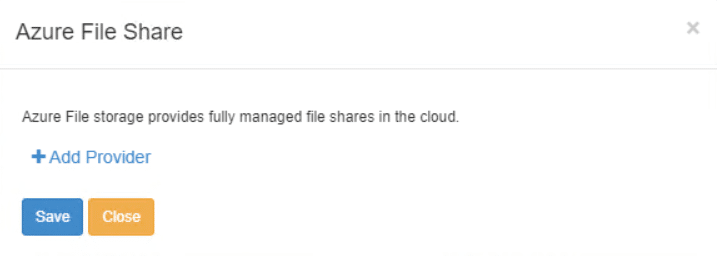
Select Add Provider
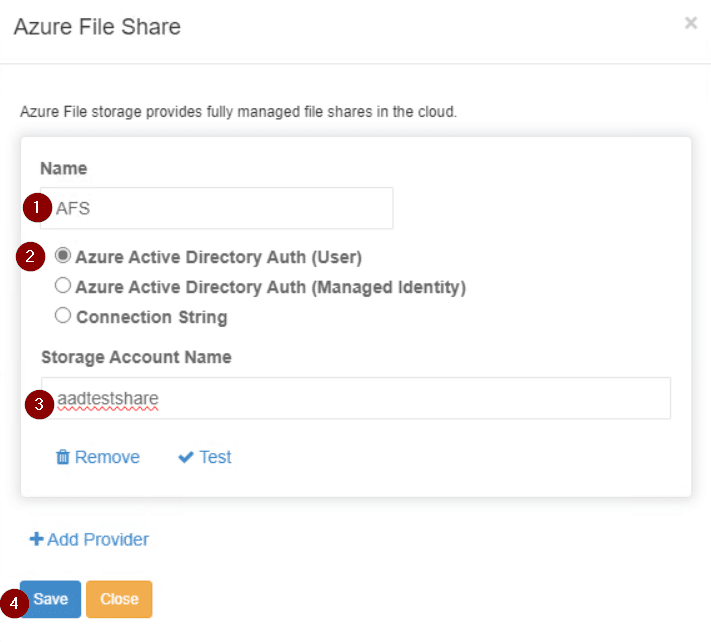
When the Entra ID Auth (User) is selected, the Storage Account Name field is available. In the field, enter the Entra ID service account that has the appropriate permissions and select Save.
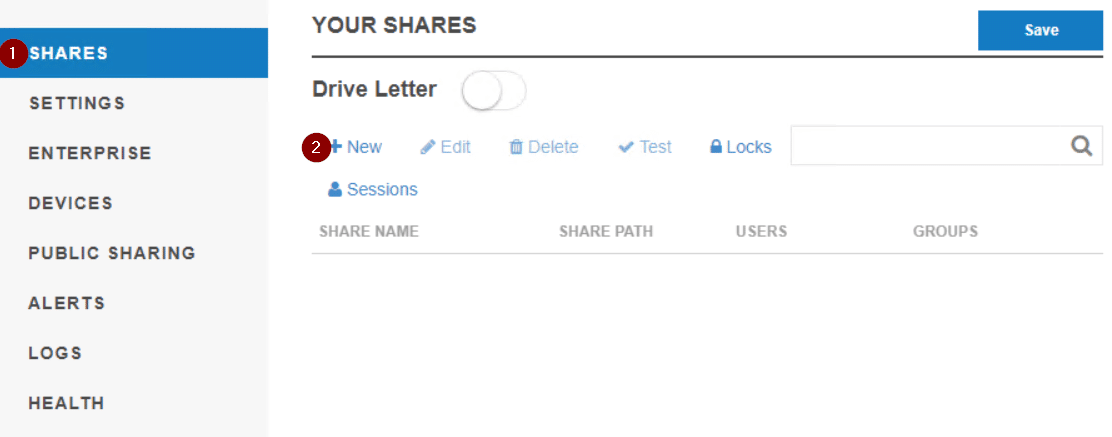
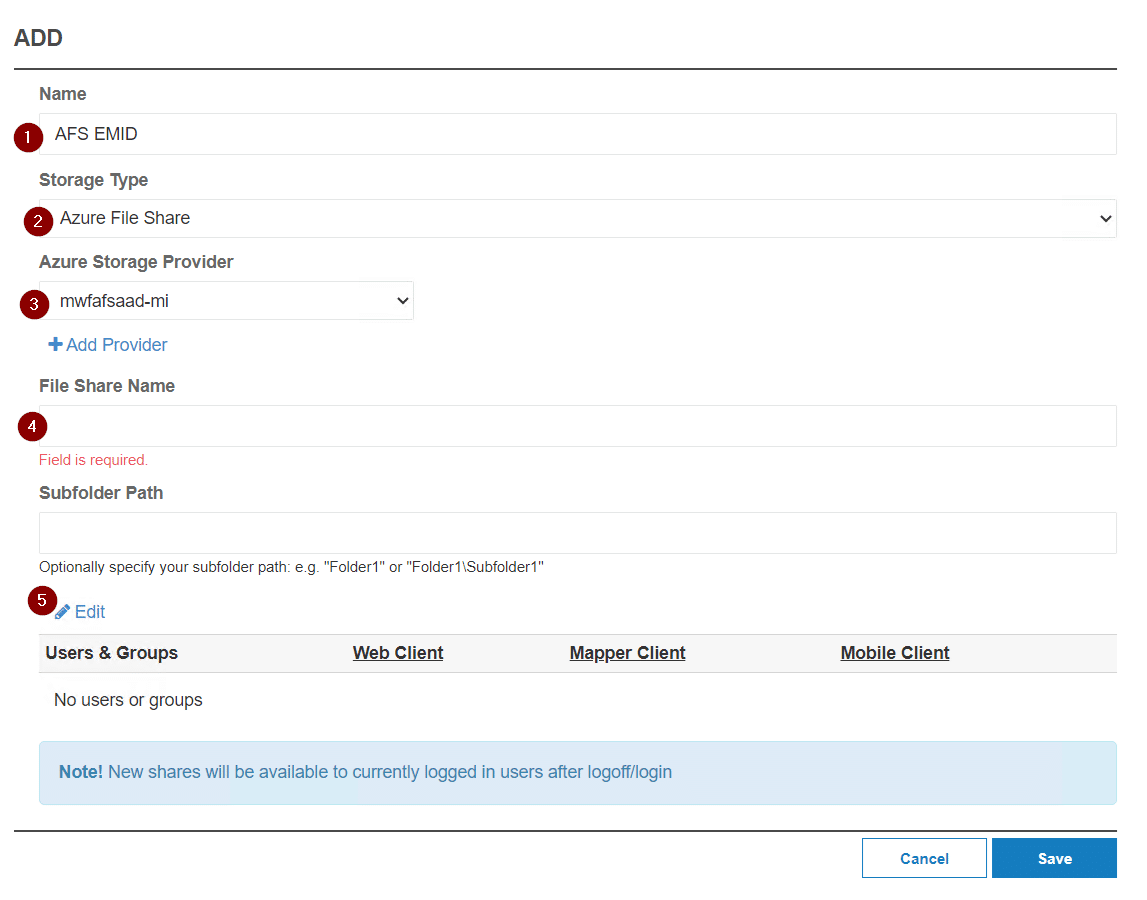
Navigate to Shares and select New.
On the Add page
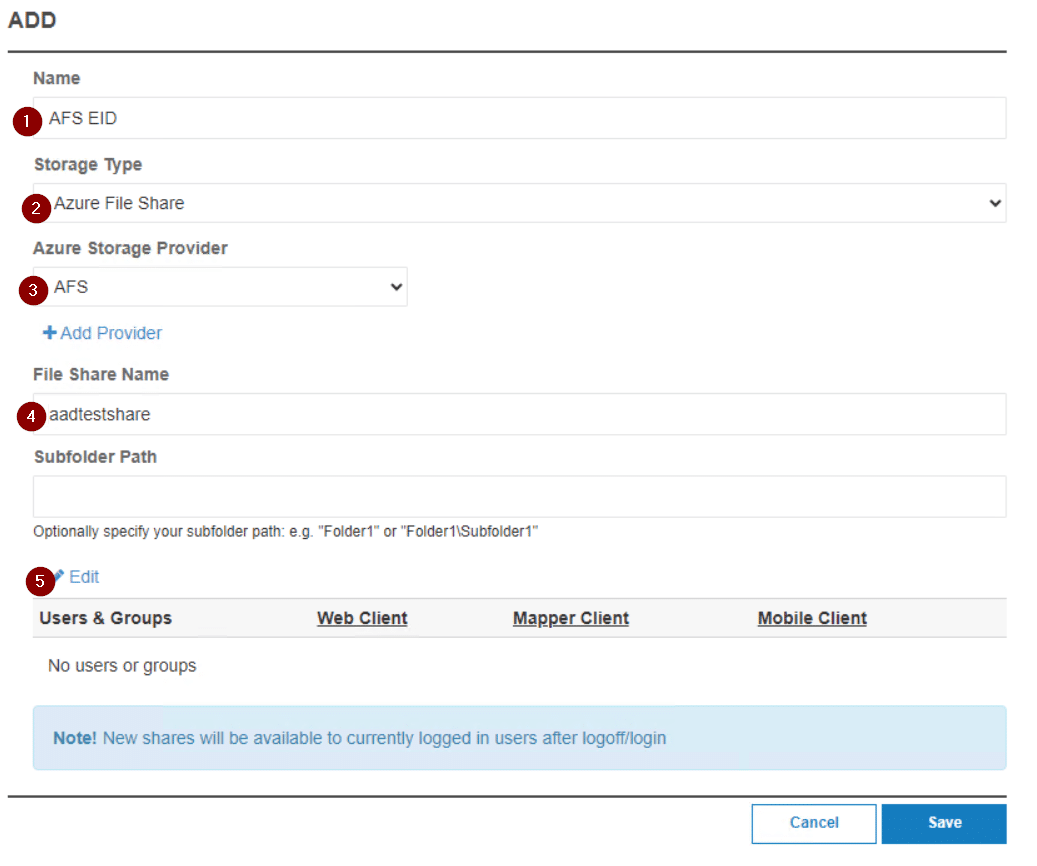
- Enter a name for the share (this will be visible to the users)
- Select Azure File Share under Storage Type
- Select the Storage Provider (this will be the name of the storage provider created earlier)
- Enter the File Share Name from Azure (this will need to be typed or pasted), and a Subfolder (if applicable)
- Click Edit to modify the Users/Groups that will have access to this share.
On the Users & Groups page
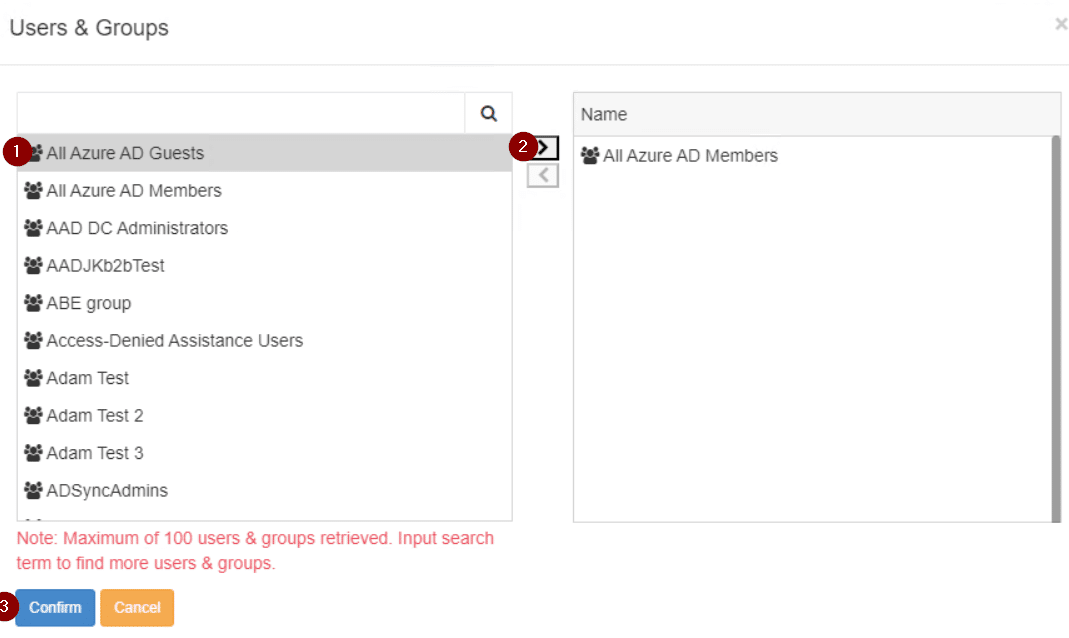
- Select a user or group in the right column, use the search bar to look for specific users/groups.
- Once the desired user/group is found, hit the arrow to add the user or group. Repeat to add other users/groups as appropriate.
- Once all the desired users/groups are added select Confirm.
Back on the Add page.
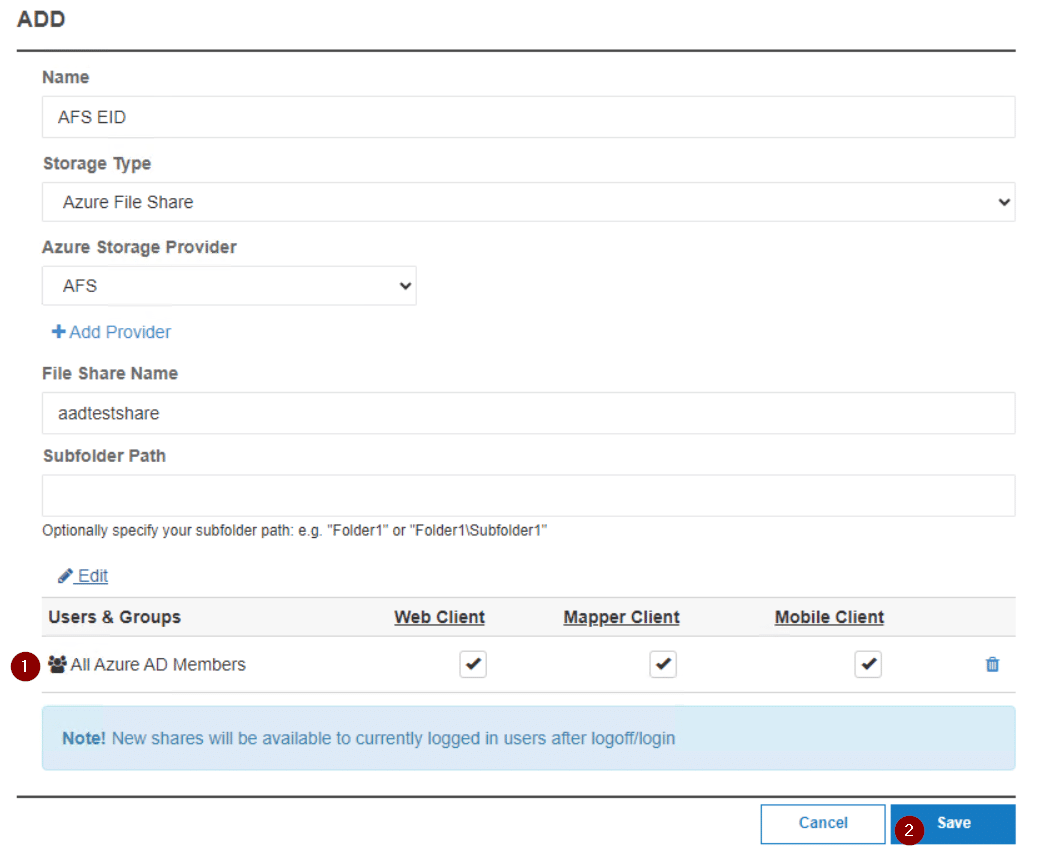
- Uncheck any clients or features you do not wish to make available to the relevant Users/Groups
- Select Save
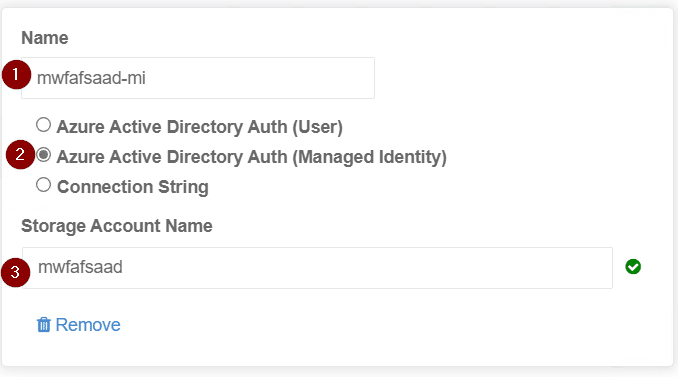
Entra ID Auth (Managed Identity)
Navigate to the Integrations tab and scroll down to Storage Providers. Select Add Settings or Modify Settings under Azure File Share.

Select Add Provider
When the Entra ID Auth (Managed Identity) is selected, the Storage Account Name field is available. In the field, enter the Entra ID service account that has the appropriate permissions and select Save.
Navigate to Shares and select New.
On the Add page
- Enter a name for the share (this will be visible to the users)
- Select Azure File Share under Storage Type
- Select the Storage Provider (this will be the name of the storage provider created earlier)
- Enter the File Share Name from Azure (this will need to be typed or pasted), and a Subfolder (if applicable)
- Click Edit to modify the Users/Groups that will have access to this share.
On the Users & Groups page

- Select a user or group in the right column, use the search bar to look for specific users/groups.
- Once the desired user/group is found, hit the arrow to add the user or group. Repeat to add other users/groups as appropriate.
- Once all the desired users/groups are added select Confirm.
Back on the Add page.

- Uncheck any clients or features you do not wish to make available to the relevant Users/Groups
- Select Save
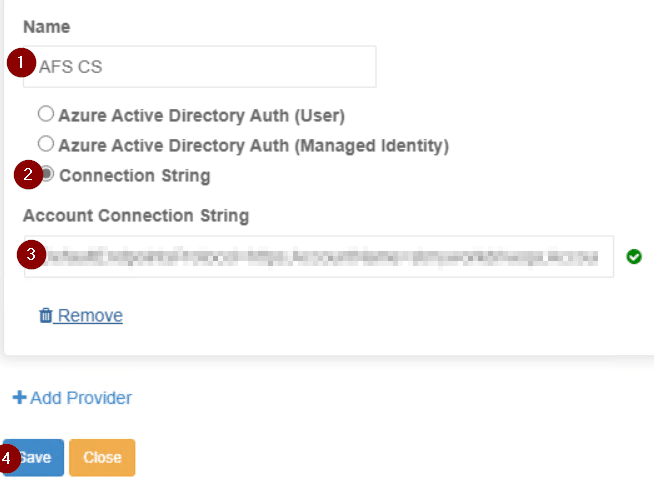
Connection String
Navigate to the Integrations tab and scroll down to Storage Providers. Select Add Settings or Modify Settings under Azure File Share.
Select Add Provider
When Connection String is selected, the Account Connection string field will become available. In the field, enter the connection string from Azure and select Save. Additional details are available from Microsoft, here.
Navigate to Shares and select New.
On the Add page
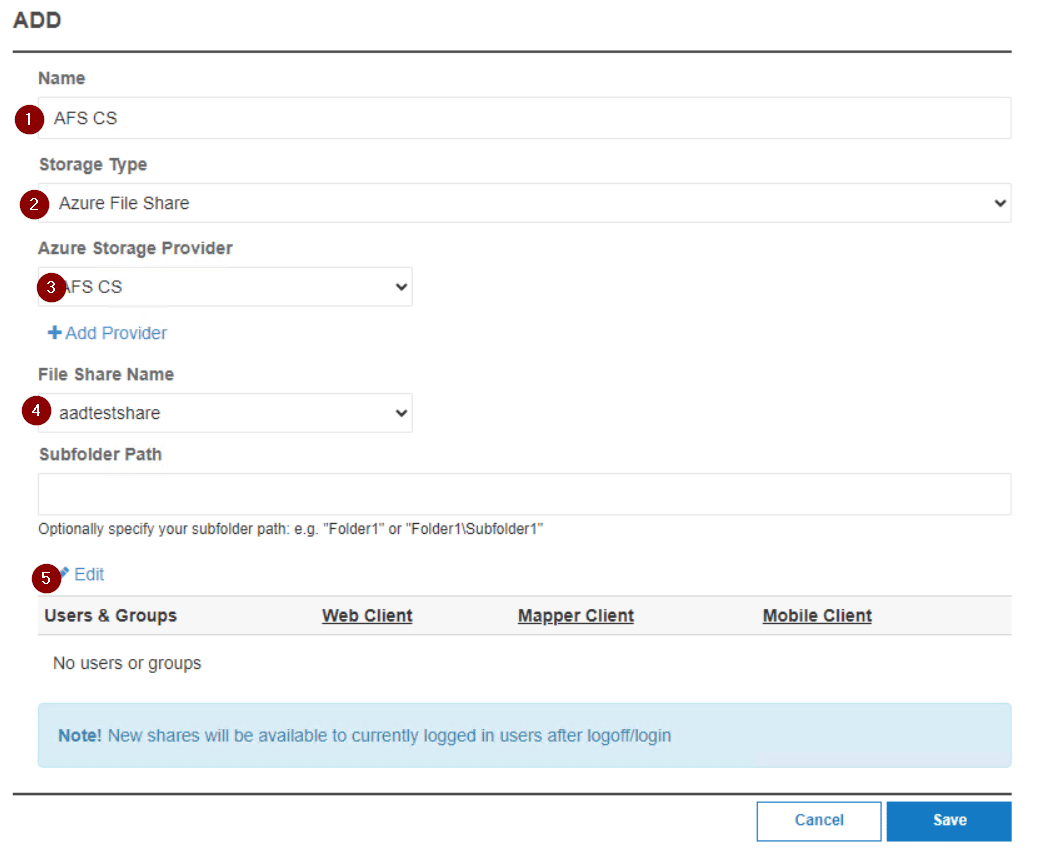
- Enter a name for the share (this will be visible to the users)
- Select Azure File Share under Storage Type
- Select the Storage Provider (this will be the name of the storage provider created earlier)
- Select the File Share that you would like to share, (type in a subfolder if applicable)
- Click Edit to modify the Users/Groups that will have access to this share.
On the Users & Groups page
- Select a user or group in the right column, use the search bar to look for specific users/groups.
- Once the desired user/group is found, hit the arrow to add the user or group. Repeat to add other users/groups as appropriate.
- Once all the desired users/groups are added select Confirm.
Back on the Add page.
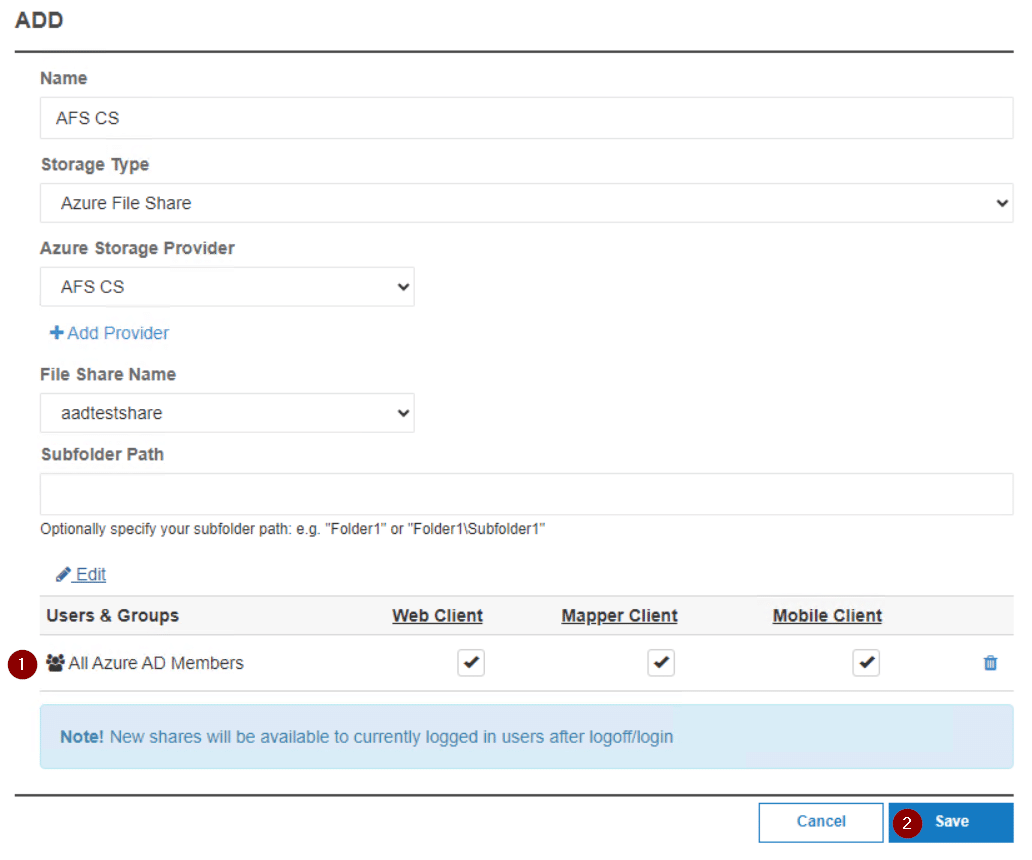
- Uncheck any clients or features you do not wish to make available to the relevant Users/Groups
- Select Save
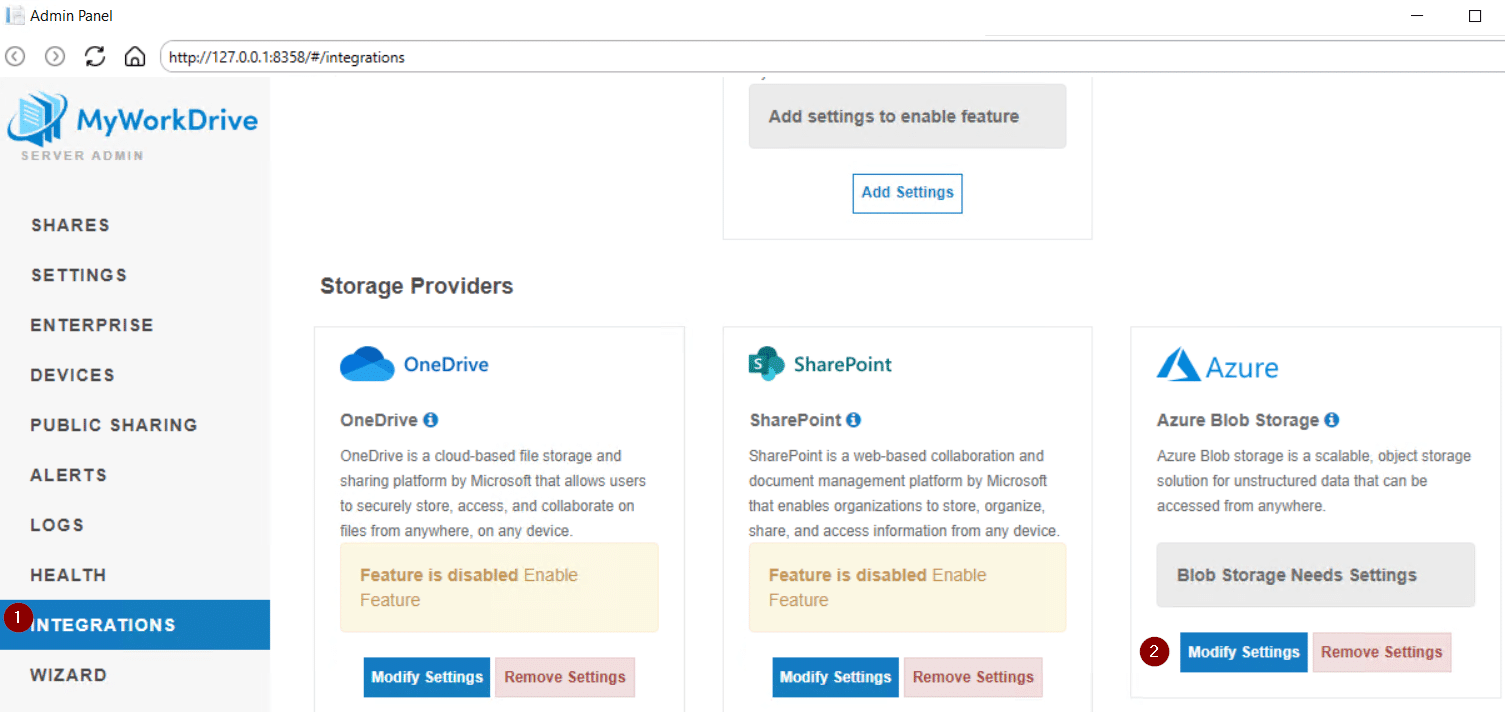
Blob Storage
Entra ID Auth (User)
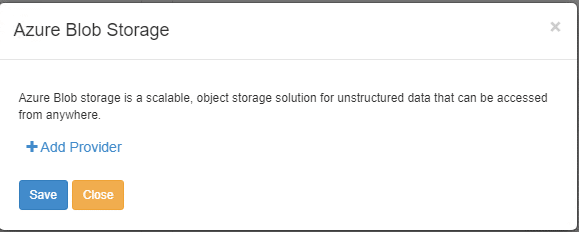
Navigate to the Integrations tab and scroll down to Storage Providers. Select Add Settings or Modify Settings under Azure Blob Storage.
Click on Add Provider
When the Entra ID Auth (User) is selected, the Storage Account Name field is available. In the field, enter the Entra ID service account that has the appropriate permissions and select Save.

Navigate to Shares and select New.
On the Add page
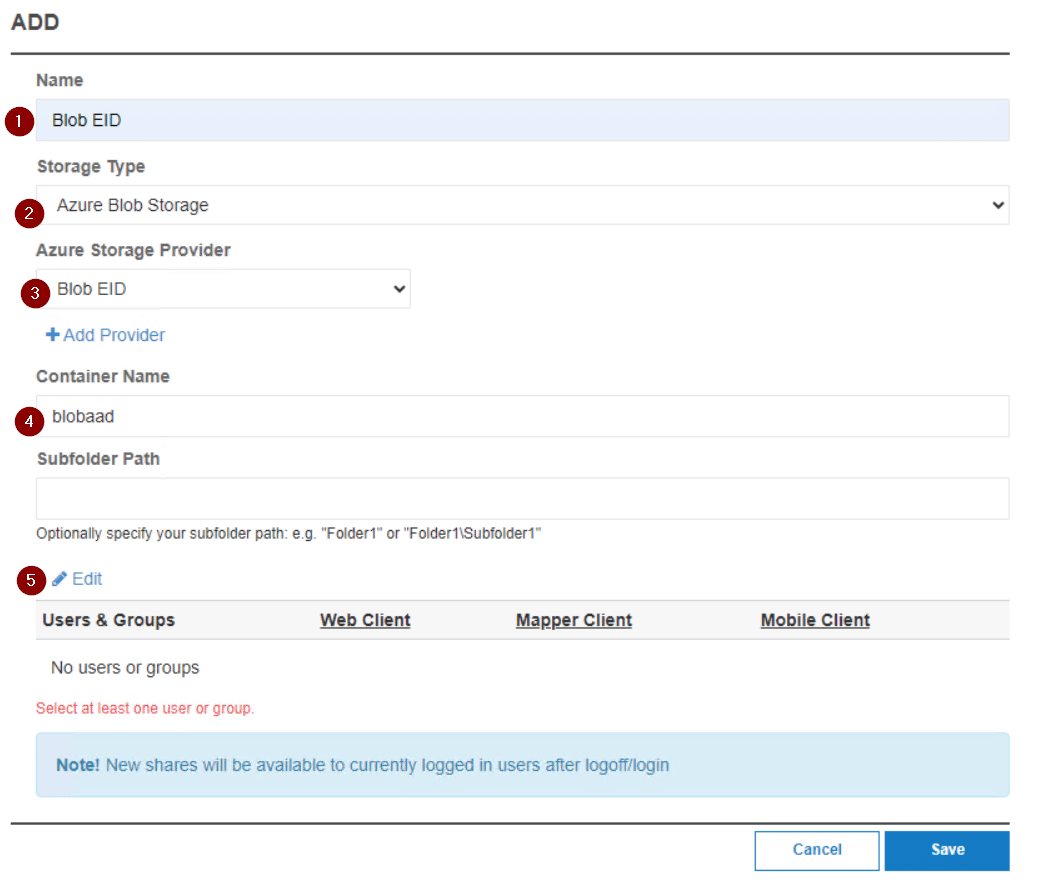
- Enter a name for the share (this will be visible to the users)
- Select Azure Blob Storage under Storage Type
- Select the Storage Provider (this will be the name of the storage provider created earlier)
- Enter the File Share Name from Azure (this will need to be typed or pasted), and a Subfolder (if applicable)
- Click Edit to modify the Users/Groups that will have access to this share.
On the Users & Groups page
- Select a user or group in the right column, use the search bar to look for specific users/groups.
- One the desired user/group is found, hit the arrow to add the user or group. Repeat to add other users/groups as appropriate.
- Once all the desired users/groups are added select Confirm.
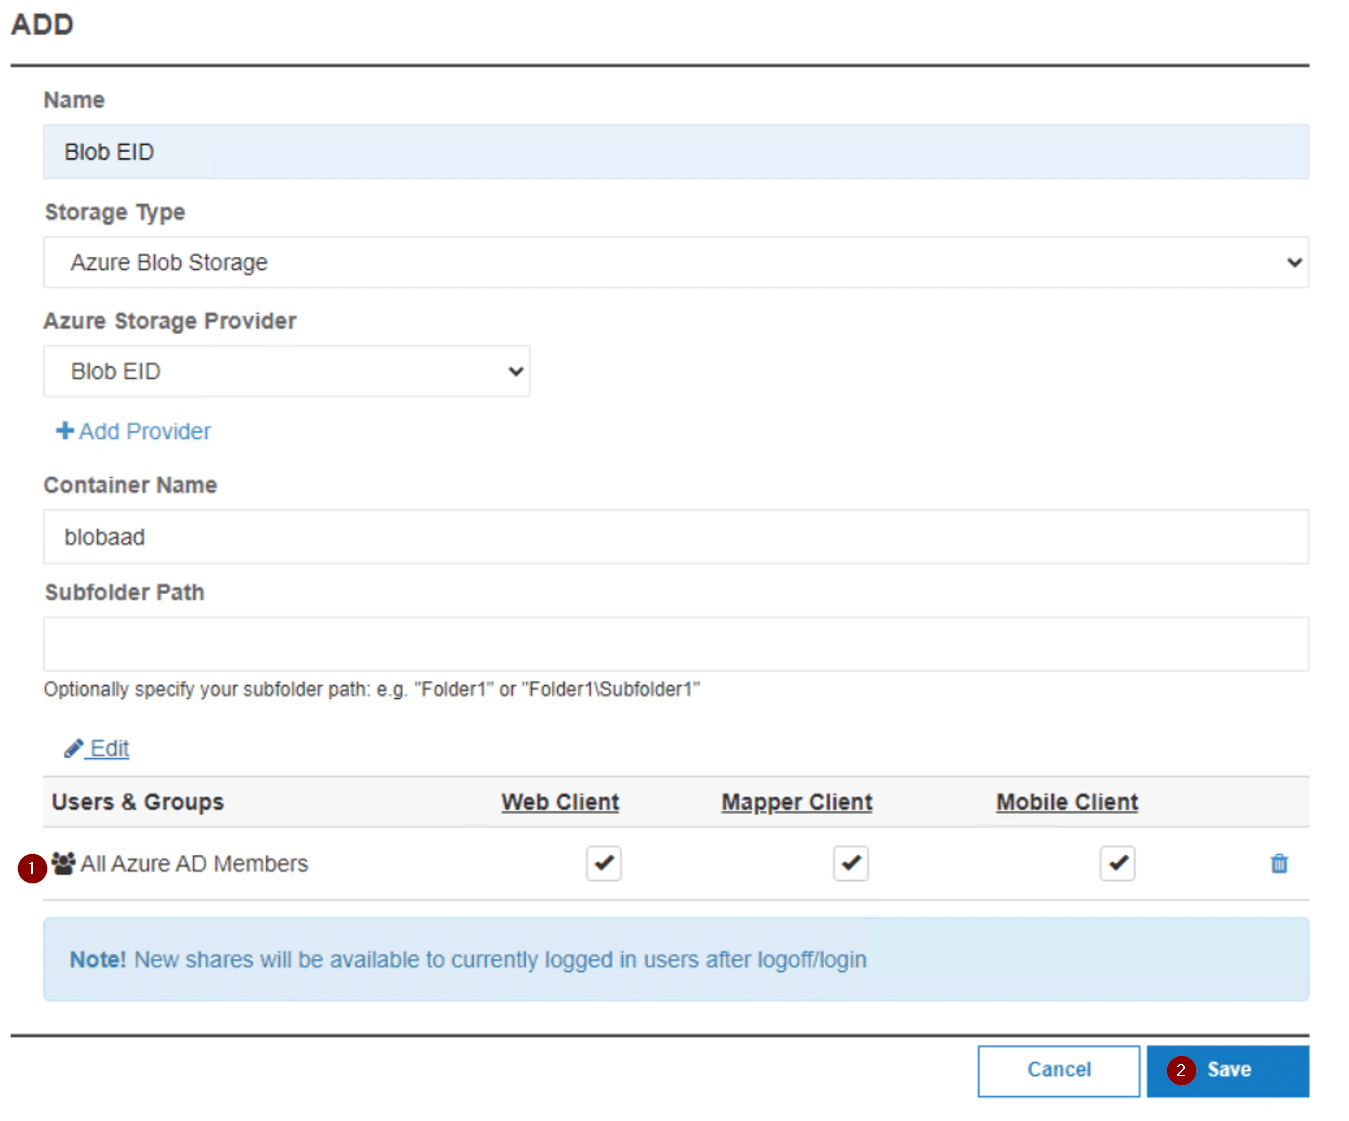
- Uncheck any clients or features you do not wish to make available to the relevant Users/Groups
- Select Save
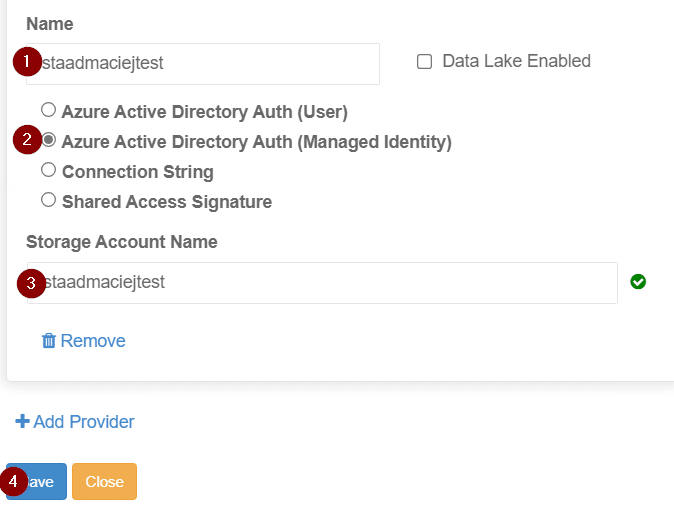
Entra ID Auth (Managed Identity)
Navigate to the Integrations tab and scroll down to Storage Providers. Select Add Settings or Modify Settings under Azure Blob Storage.
Click on Add Provider
When the Entra ID Auth (User) is selected, the Storage Account Name field is available. In the field, enter the Entra ID service account that has the appropriate permissions and select Save.
Navigate to Shares and select New.
On the Add page

- Enter a name for the share (this will be visible to the users)
- Select Azure Blob Storage under Storage Type
- Select the Storage Provider (this will be the name of the storage provider created earlier)
- Enter the File Share Name from Azure (this will need to be typed or pasted), and a Subfolder (if applicable)
- Click Edit to modify the Users/Groups that will have access to this share.
On the Users & Groups page
- Select a user or group in the right column, use the search bar to look for specific users/groups.
- One the desired user/group is found, hit the arrow to add the user or group. Repeat to add other users/groups as appropriate.
- Once all the desired users/groups are added select Confirm.
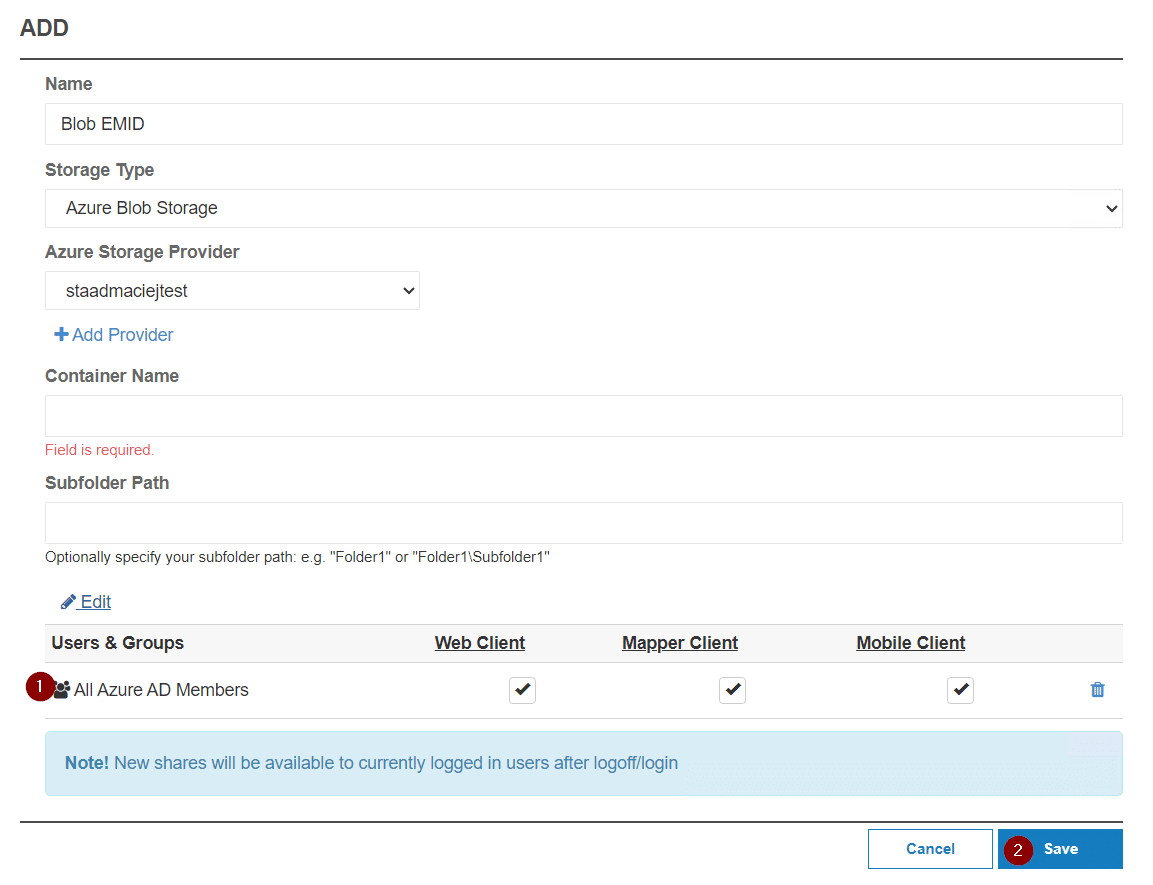
- Uncheck any clients or features you do not wish to make available to the relevant Users/Groups
- Select Save
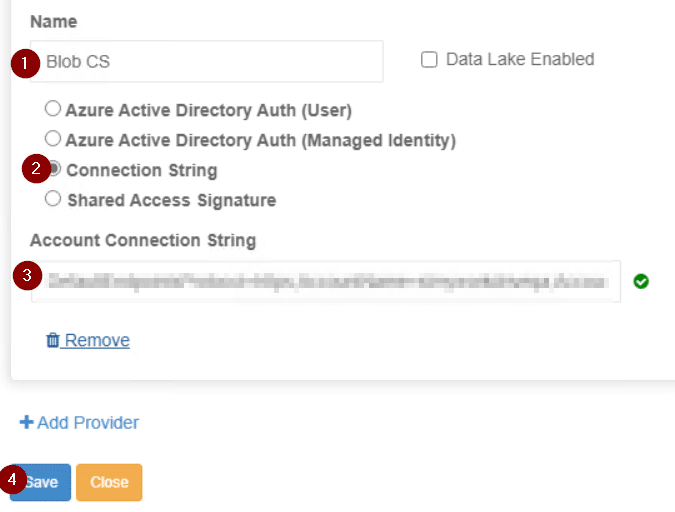
Connection String
Navigate to the Integrations tab and scroll down to Storage Providers. Select Add Settings under Azure Blob Storage.
Click on Add Provider
When Connection String is selected, the Account Connection string field will become available. In the field, enter the connection string from Azure and select Save. Additional details are available from Microsoft, here.
Navigate to Shares and select New.
On the Add page
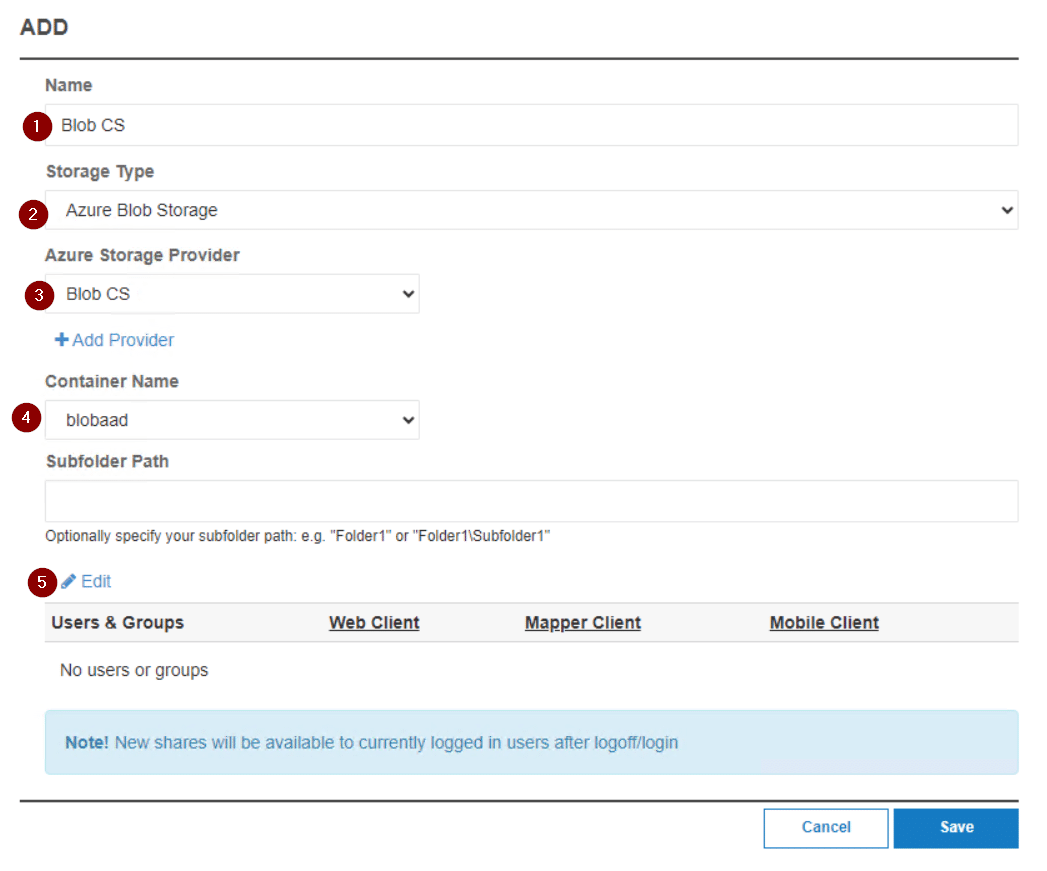
- Enter a name for the share (this will be visible to the users)
- Select Azure Blob Storage under Storage Type
- Select the Storage Provider (this will be the name of the storage provider created earlier)
- Select the Container Name that you would like to share, (type in a subfolder if applicable)
- Click Edit to modify the Users/Groups that will have access to this share.
On the Users & Groups page
- Select a user or group in the right column, use the search bar to look for specific users/groups.
- One the desired user/group is found, hit the arrow to add the user or group. Repeat to add other users/groups as appropriate.
- Once all the desired users/groups are added select Confirm.
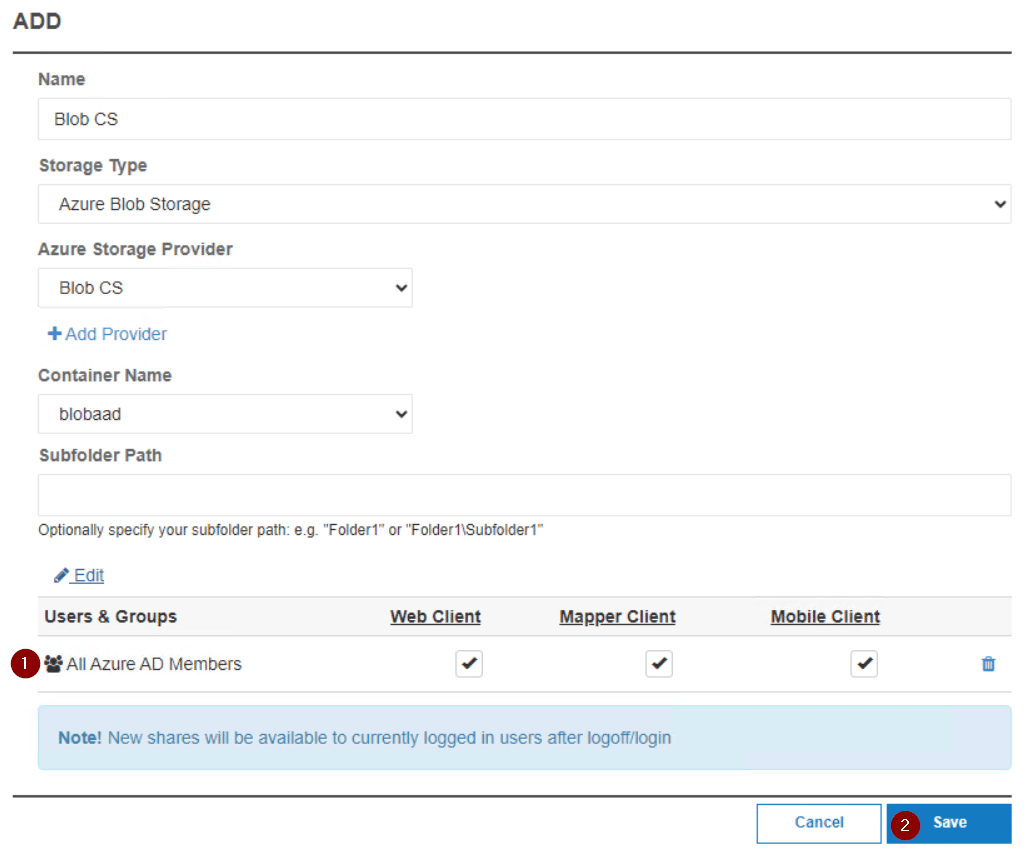
- Uncheck any clients or features you do not wish to make available to the relevant Users/Groups
- Select Save